K |
Terne (Diskussion | Beiträge) K (Unklarheiten behoben) |
||
| Zeile 7: | Zeile 7: | ||
Network drives are displayed directly next to the hard disks of your computer and thus allow you a quick and easy access to the additional memory: <br> | Network drives are displayed directly next to the hard disks of your computer and thus allow you a quick and easy access to the additional memory: <br> | ||
* When you mount your personal network storage, you will be taken to your user or home directory. <br> | * When you mount your personal network storage, you will be taken to your user or home directory. <br> | ||
| − | * If you are a member of a university group with network storage and | + | * If you are a member of a university group with network storage and embed it, you will be taken to the appropriate group directory. |
== Requirements == | == Requirements == | ||
| − | * '''Home directory:''' If you want to use your personal network storage, it must be activated once | + | * '''Home directory:''' If you want to use your personal network storage, it must be activated once through the service portal. |
| − | * '''Group | + | * '''Group storage:''' You need the authorization for the group memory. This is assigned by your department. |
== What needs to be done? == | == What needs to be done? == | ||
| Zeile 18: | Zeile 18: | ||
* Mount group network storage as network drives | * Mount group network storage as network drives | ||
| − | == Step-by-step | + | == Step-by-step guide == |
=== Connect to the university network === | === Connect to the university network === | ||
To mount a network drive in Windows 10, you must first ensure that your computer is connected to the university network. | To mount a network drive in Windows 10, you must first ensure that your computer is connected to the university network. | ||
| Zeile 130: | Zeile 130: | ||
== Troubleshooting == | == Troubleshooting == | ||
| − | If an error message ( | + | If an error message (as seen below) appears during the process, please follow the instructions in the first step [[Netzlaufwerk einbinden (Windows 10)#Verbindung zum Netzwerk der Universität herstellen | "Connect to the university network"]]. |
[[Datei:Netzlaufwerk_einbinden_Win_10_Fehlermeldung.PNG|links|mini|ohne|400px]] | [[Datei:Netzlaufwerk_einbinden_Win_10_Fehlermeldung.PNG|links|mini|ohne|400px]] | ||
<br clear=all> | <br clear=all> | ||
Version vom 3. April 2020, 12:46 Uhr
The network storage available to you at the University of Paderborn can be integrated into Windows 10 as a so-called network drive.
Network drives are displayed directly next to the hard disks of your computer and thus allow you a quick and easy access to the additional memory:
- When you mount your personal network storage, you will be taken to your user or home directory.
- If you are a member of a university group with network storage and embed it, you will be taken to the appropriate group directory.
Requirements[Bearbeiten | Quelltext bearbeiten]
- Home directory: If you want to use your personal network storage, it must be activated once through the service portal.
- Group storage: You need the authorization for the group memory. This is assigned by your department.
What needs to be done?[Bearbeiten | Quelltext bearbeiten]
- Establish a connection to the network of the University of Paderborn
- Mount personal network storage as network drive
- Mount group network storage as network drives
Step-by-step guide[Bearbeiten | Quelltext bearbeiten]
Connect to the university network[Bearbeiten | Quelltext bearbeiten]
To mount a network drive in Windows 10, you must first ensure that your computer is connected to the university network.
Do you work from outside the university? Are you on the road?
- First connect with the program OpenVPN to the VPN network of the university
Are you on the campus of the university? You can connect to the university network as follows
- Via LAN cable to the network sockets
- Via the WLAN network Eduroam
- Via the WLAN network Webauth
Include user directory[Bearbeiten | Quelltext bearbeiten]
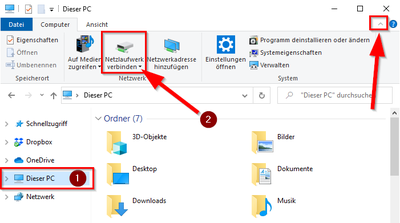
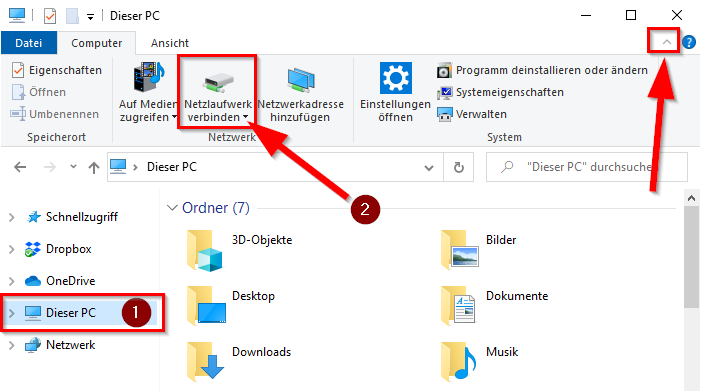
- Open the "Windows Explorer"
- Click on "This PC" on the left margin
- Then click on "Connect network drive" in the upper menu bar
- If the menu is not displayed, you can expand it by clicking on the arrow
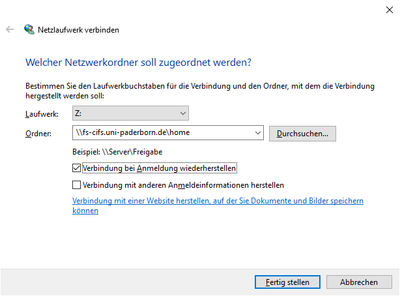
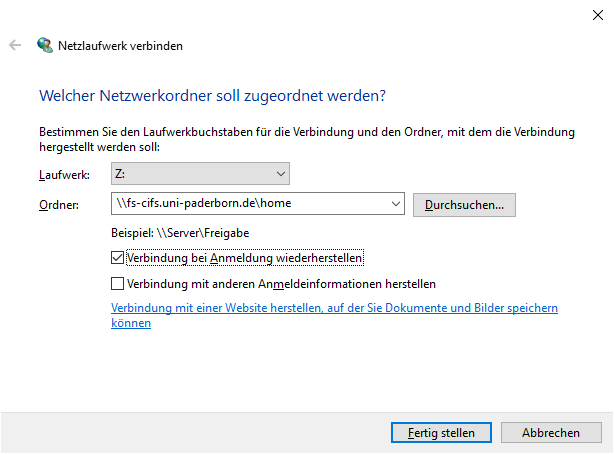
Please enter the following data in the dialog window "Connect network drive":
- Drive: Z: (or select any other drive letter not yet in use)
- Folder: \\\fs-cifs.uni-paderborn.de\home
- Restore connection on login: Check the box (if desired)
- Establish connection with other login information: no check mark
- Then confirm by clicking on "Finish"
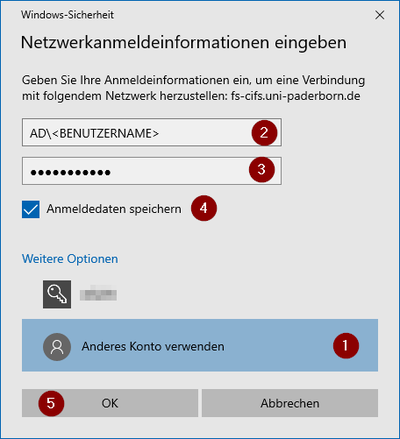
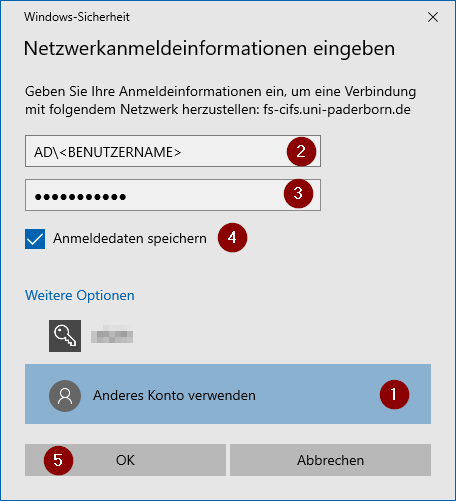
A window with a password query may appear at this point
- Click on "Use other account"
- Enter "AD\<username>" in the appropriate field
- Replace "<username>" with your Uni-Account
- Enter the password for your Uni-Account in the corresponding field
- Check the box for "Save login data"
- Click on "OK" to finish
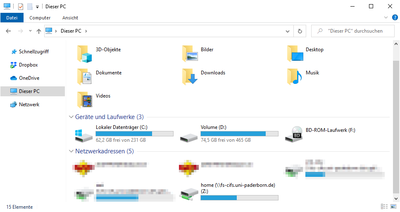
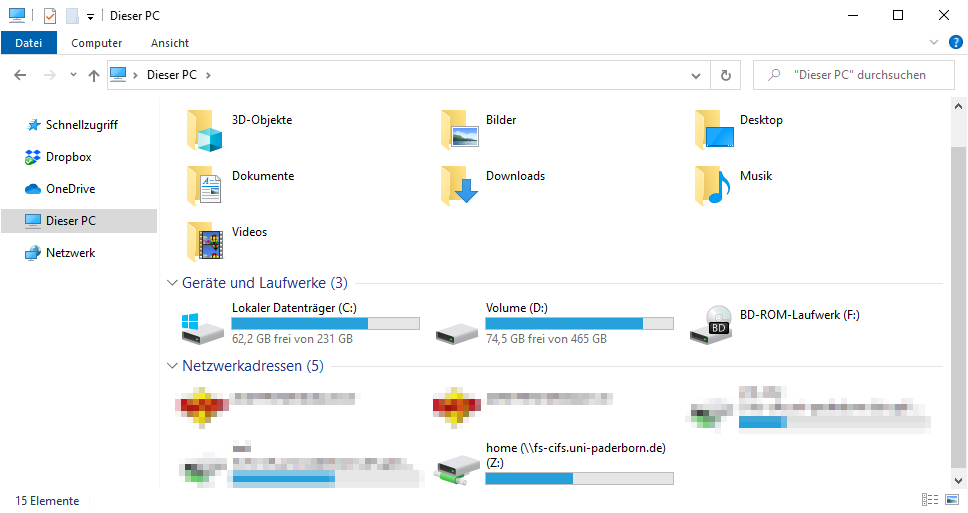
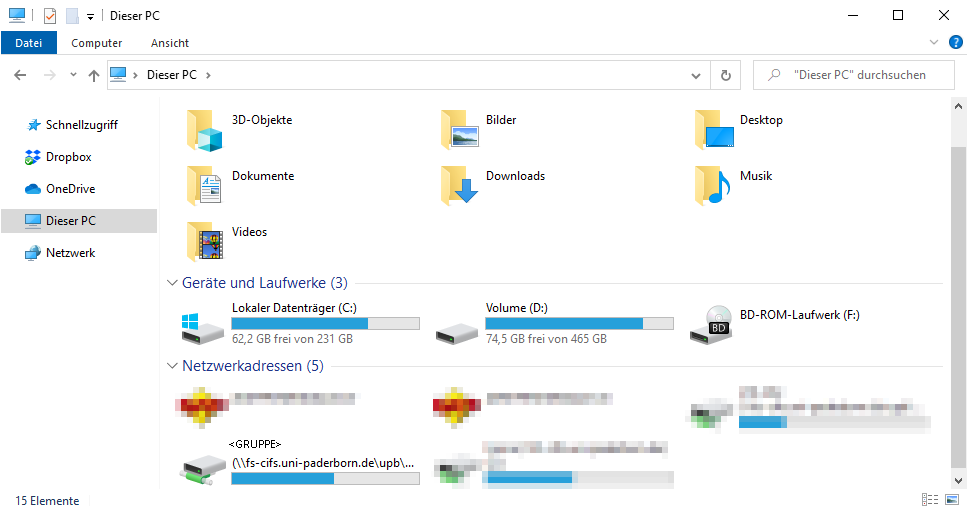
Your personal user directory is now displayed under "Network addresses". You can recognize it by the name "Home".
The size of the storage space corresponds to your quota.
Open your network drive with a double click.
- Under "data" you can store your own data
- Under "public" you can make data accessible to other persons
Include group directory[Bearbeiten | Quelltext bearbeiten]
- Open the "Windows Explorer"
- Click on "This PC" on the left margin
- Then click on "Connect network drive" in the upper menu bar
- If the menu is not displayed, you can expand it by clicking on the arrow
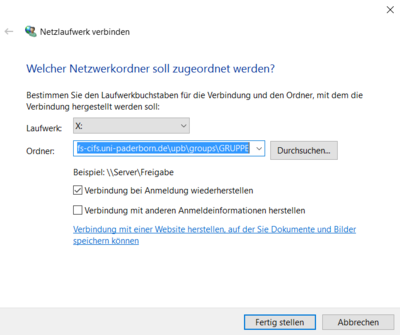
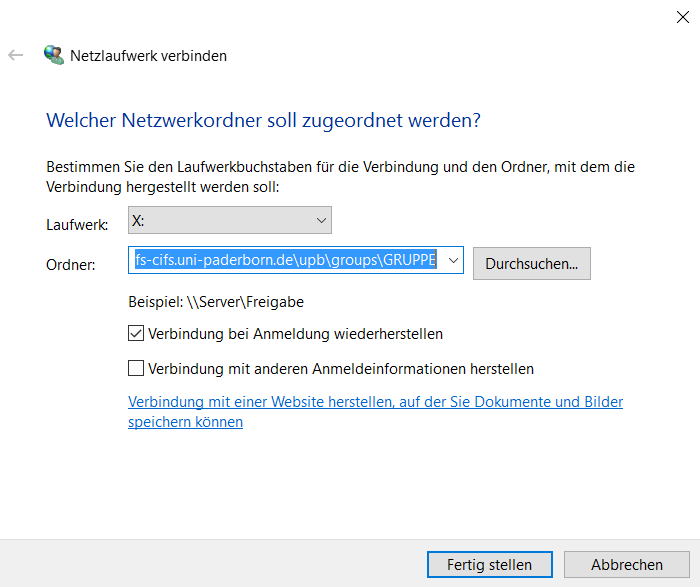
Please enter the following data in the dialog window "Connect network drive":
- Drive: Y: (or select any other drive letter not yet in use)
- Folder: \\fs-cifs.uni-paderborn.com\upb\groups\group
- For GROUP use the lower-case short form of the group name
- Restore connection on login: Check the box (if desired)
- Establish connection with other login information: no check mark
- Then confirm by clicking on "Finish"
Note: You must be a member of the desired group to mount the group drive.
A window with a password query may appear at this point
- Click on "Use other account"
- Enter "AD\<username>" in the appropriate field
- Replace "<username>" with your Uni-Account
- Enter the password for your Uni-Account in the corresponding field
- Check the box for "Save login data"
- Click on "OK" to finish
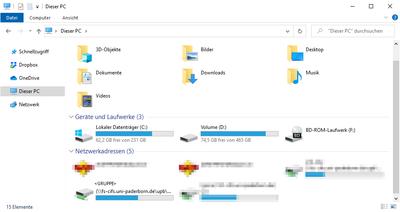
The group directory is now displayed under "Network Addresses".
The size of the storage space corresponds to the quota of the group directory.
Open the drive with a double click. In this example, you can recognize it by the name <Group>. You can now store data for common viewing and editing in the group directory under "data"or make it accessible to others under "public".
Mount root directory as network drive[Bearbeiten | Quelltext bearbeiten]
As an alternative to including individual group directories, you can also connect to the main directory by default. From there you can access all group directories for which you have permission.
Troubleshooting[Bearbeiten | Quelltext bearbeiten]
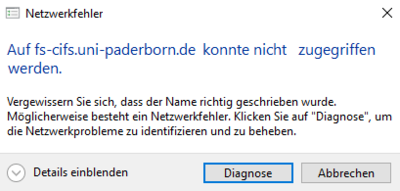
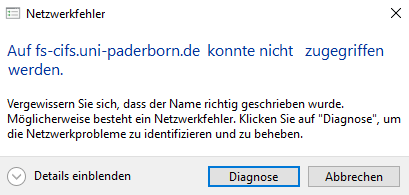
If an error message (as seen below) appears during the process, please follow the instructions in the first step "Connect to the university network".
Useful instructions[Bearbeiten | Quelltext bearbeiten]
- Gruppenverwaltung Mitglied hinzufügen/ Group management Add member
- Rechtevergabe im Netzwerkspeicher/ Assigning rights in the network storage
- Zugriff auf den Netzwerkspeicher/ Access to network storage
- Bachupfunktion des Netzwerkspeichers/ Backup function of the network storage
