Jnk (Diskussion | Beiträge) |
Jnk (Diskussion | Beiträge) K (Unneccessary space deleted) |
||
| (5 dazwischenliegende Versionen von einem anderen Benutzer werden nicht angezeigt) | |||
| Zeile 4: | Zeile 4: | ||
|translated title=Mount network drive (Windows 10) | |translated title=Mount network drive (Windows 10) | ||
}} | }} | ||
| − | The network storage available to you | + | The network storage available to you from the University of Paderborn can be integrated into Windows 10 as a so-called network drive. |
| − | Network drives are displayed directly next to | + | Network drives are displayed directly next to your computer's hard drives, giving you quick and easy access to the additional storage: <br> |
| − | * | + | * If you mount your personal network storage, you will be taken to your user or home directory. <br> |
| − | * If you are a member of a university group with network storage and | + | * If you are a member of a university group with network storage and integrate it, you will be taken to the corresponding group directory. |
| − | == Requirements == | + | ==Requirements== |
| − | * '''Home directory:''' If you want to use your personal network storage, it must be activated once | + | * '''Home directory:''' If you want to use your personal network storage, it must be activated once via the service portal. |
| − | * '''Group | + | * '''Group Storage:''' The permission for the group storage. This is assigned by your area. |
== What needs to be done? == | == What needs to be done? == | ||
| − | * | + | * Connect to the Paderborn University network |
| − | * Mount personal network storage as network drive | + | * Mount personal network storage as a network drive |
* Mount group network storage as network drives | * Mount group network storage as network drives | ||
| − | + | == Connect to the university network == | |
| − | + | To mount a network drive in Windows 10, you must first make sure that your computer is connected to the university's network. | |
| − | To mount a network drive in Windows 10, you must first | ||
<br clear=all> | <br clear=all> | ||
<br> | <br> | ||
| − | <span style="color:green"> Do you work from outside the university? Are you on the | + | <span style="color:green"> Do you work from outside the university? Are you on the way?</span> |
| − | * First connect | + | * First connect to the program [[VPN unter Windows 10 | OpenVPN]] with the university's VPN network |
<br clear=all> | <br clear=all> | ||
| − | Are you on the campus | + | Are you on the university campus? You can connect to the university network as follows |
| − | * Via LAN cable to the [[ | + | * Via LAN cable to the [[Netzwerkzugang per LAN-Dose für Mitarbeiter | Network Sockets]] |
| − | * Via the WLAN network [[Eduroam einrichten|Eduroam]] | + | * Via the WLAN network [[Eduroam einrichten | Eduroam]] |
| − | * Via the WLAN network [[ | + | * Via the WLAN network [[Webauth einrichten | Webauth]] |
| − | === Include | + | ==Mount drive== |
| + | <bootstrap_accordion> | ||
| + | |||
| + | <bootstrap_panel heading="Include directory Windows 10" color="info"> | ||
[[Datei:Netzlaufwerk_einbinden_Win_10_Startbildschirm.PNG|links|mini|ohne|400px]] | [[Datei:Netzlaufwerk_einbinden_Win_10_Startbildschirm.PNG|links|mini|ohne|400px]] | ||
<br> | <br> | ||
| − | * Open | + | * Open '''Windows Explorer''' |
<br clear=all> | <br clear=all> | ||
[[Datei:Netzlaufwerk_einbinden_Win_10_Menüband_erweitern.PNG|links|mini|ohne|400px]] | [[Datei:Netzlaufwerk_einbinden_Win_10_Menüband_erweitern.PNG|links|mini|ohne|400px]] | ||
<br> | <br> | ||
| − | * Click | + | * Click '''"This PC"''' on the left edge |
| − | * Then click on ''' | + | * Then click on '''Map network drive''' |
| − | * If the menu | + | * If you don't see the menu, you can expand it by clicking on the arrow. |
<br clear=all> | <br clear=all> | ||
| − | Please enter the following data in the | + | Please enter the following data in the '''"Connect network drive"''' dialog window: |
[[Datei:Netzlaufwerk_einbinden_Win_10_Netzwerkordner.PNG|links|mini|ohne|400px]] | [[Datei:Netzlaufwerk_einbinden_Win_10_Netzwerkordner.PNG|links|mini|ohne|400px]] | ||
<br> | <br> | ||
| − | * '''Drive:''' Z: (or select any other drive letter | + | * '''Drive:''' Z: (or select any other unused drive letter) |
| − | * '''Folder:''' | + | * '''Folder:''' |
| − | * '''Restore connection | + | <pre>\\fs-cifs.uni-paderborn.de\home</pre> |
| − | * ''' | + | * '''Restore connection upon login:''' check mark (if desired) |
| − | * Then confirm by clicking on ''' | + | * '''Connect using different credentials:''' leave unchecked |
| + | * Then confirm by clicking on '''Finish''' | ||
<br clear=all> | <br clear=all> | ||
| − | |||
| − | |||
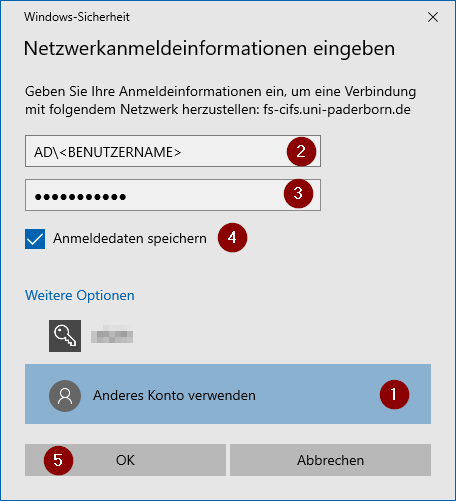
A window with a password query may appear at this point | A window with a password query may appear at this point | ||
[[Datei:Netzlaufwerk_einbinden_Win_10_Netzwerkanmeldeinformation.PNG|links|mini|ohne|400px]] | [[Datei:Netzlaufwerk_einbinden_Win_10_Netzwerkanmeldeinformation.PNG|links|mini|ohne|400px]] | ||
<br> | <br> | ||
| − | * Click | + | * Click '''"Use Another Account"''' |
* Enter '''"AD\<username>"''' in the appropriate field | * Enter '''"AD\<username>"''' in the appropriate field | ||
| − | * Replace '''"<username>"''' with your | + | * Replace '''"<username>"''' with your university account |
| − | * Enter the password for your | + | * Enter the password for your university account in the appropriate field |
| − | * Check the box for '''"Save login | + | * Check the box for '''"Save login details"''' |
| − | * Click | + | * Click '''"OK"''' to finish |
<br clear=all> | <br clear=all> | ||
| − | Your personal user directory | + | Your personal user directory will now be displayed under '''"Network addresses"'''. You can recognize it by the name '''"Home"'''. |
<br> | <br> | ||
| − | The size of the storage space corresponds to your | + | The size of the storage space corresponds to your network storage quota Quota]]. |
[[Datei:Netzlaufwerk_einbinden_Win_10_Home.PNG|links|mini|ohne|400px]] | [[Datei:Netzlaufwerk_einbinden_Win_10_Home.PNG|links|mini|ohne|400px]] | ||
| Zeile 75: | Zeile 76: | ||
Open your network drive with a double click. | Open your network drive with a double click. | ||
| − | * | + | * You can store your own data under '''"data"''' |
| − | + | * You can make data accessible to other people under '''"public"''' | |
| + | <br clear=all> | ||
| − | = | + | </bootstrap_panel> |
| + | |||
| + | <bootstrap_panel heading="Include directory Windows 11" color="info"> | ||
[[Datei:Netzlaufwerk_einbinden_Win_10_Startbildschirm.PNG|links|mini|ohne|400px]] | [[Datei:Netzlaufwerk_einbinden_Win_10_Startbildschirm.PNG|links|mini|ohne|400px]] | ||
<br> | <br> | ||
| − | * Open | + | * Open '''Windows Explorer''' |
<br clear=all> | <br clear=all> | ||
| − | [[Datei: | + | [[Datei:Netzlaufwerk-einbinden-windows-01.png|links|mini|ohne|550px]] |
<br> | <br> | ||
| − | * | + | * Right-click on '''"This PC"''' on the left edge |
| − | * Then click | + | * Then click '''"Map network drive"''' in the context menu |
| − | |||
<br clear=all> | <br clear=all> | ||
| − | + | Please enter the following data in the '''"Connect network drive"''' dialog window: | |
| − | Please enter the following data in the | + | [[Datei:Netzlaufwerk_einbinden_Win_10_Netzwerkordner.PNG|links|mini|ohne|400px]] |
| − | [[Datei: | + | <br> |
| + | * '''Drive:''' Z: (or select any other unused drive letter) | ||
| + | * '''Folder:''' Path for the network drive. Here, for example, is the home directory. | ||
| + | * '''Restore connection upon login:''' check mark (if desired) | ||
| + | * '''Connect using different credentials:''' leave unchecked | ||
<br> | <br> | ||
| − | + | * Finally, click '''"Finish"'''. | |
| − | * | ||
| − | |||
| − | |||
| − | |||
| − | |||
| − | |||
<br clear=all> | <br clear=all> | ||
| − | |||
A window with a password query may appear at this point | A window with a password query may appear at this point | ||
[[Datei:Netzlaufwerk_einbinden_Win_10_Netzwerkanmeldeinformation.PNG|links|mini|ohne|400px]] | [[Datei:Netzlaufwerk_einbinden_Win_10_Netzwerkanmeldeinformation.PNG|links|mini|ohne|400px]] | ||
<br> | <br> | ||
| − | * Click | + | * Click '''"Use Another Account"''' |
* Enter '''"AD\<username>"''' in the appropriate field | * Enter '''"AD\<username>"''' in the appropriate field | ||
| − | * Replace '''"<username>"''' with your | + | * Replace '''"<username>"''' with your university account |
| − | * Enter the password for your | + | * Enter the password for your university account in the appropriate field |
| − | * Check the box for '''"Save login | + | * Check the box for '''"Save login details"''' |
| − | * Click | + | * Click '''"OK"''' to finish |
<br clear=all> | <br clear=all> | ||
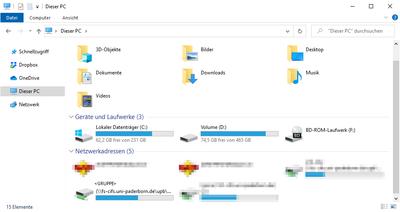
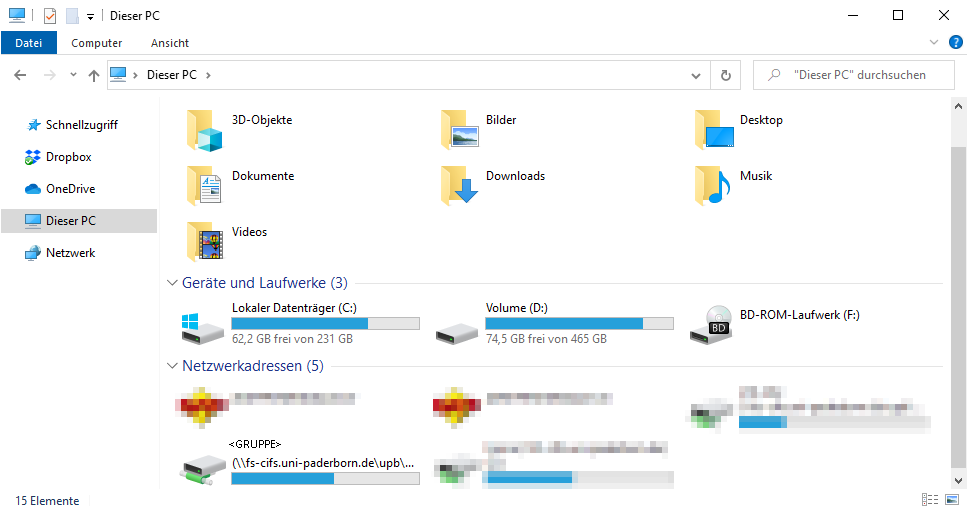
| − | The | + | The connected network drives will now be displayed under “This PC” in the Network addresses area. |
<br> | <br> | ||
| − | The size of the storage space corresponds to the [[ | + | [[Datei:Netzlaufwerk_einbinden_Win_10_Home.PNG|links|mini|ohne|400px]] |
| + | <br clear=all> | ||
| + | |||
| + | </bootstrap_panel> | ||
| + | |||
| + | <bootstrap_panel heading="Include user directory" color="info"> | ||
| + | Include the following directory: | ||
| + | <br> | ||
| + | <pre>\\fs-cifs.uni-paderborn.de\home</pre> | ||
| + | <br> | ||
| + | |||
| + | Your personal user directory will now be displayed under '''"Network addresses"'''. You can recognize it by the name '''"Home"'''. | ||
| + | <br> | ||
| + | The size of the storage space corresponds to your network storage quota Quota]]. | ||
| + | |||
| + | [[Datei:Netzlaufwerk_einbinden_Win_10_Home.PNG|links|mini|ohne|400px]] | ||
| + | <br clear=all> | ||
| + | |||
| + | Open your network drive with a double click. | ||
| + | * You can store your own data under '''"data"''' | ||
| + | * You can make data accessible to other people under '''"public"''' | ||
| + | <br clear=all> | ||
| + | |||
| + | </bootstrap_panel> | ||
| + | |||
| + | <bootstrap_panel heading="Include group directory" color="info"> | ||
| + | If you want to integrate a group drive, you must be a member of the corresponding rights group. | ||
| + | <br> | ||
| + | |||
| + | Include the following directory: | ||
| + | <pre>\\fs-cifs.uni-paderborn.de\upb\groups\GROUP</pre> | ||
| + | * For '''GROUP''' use the lowercase short form of the group name | ||
| + | <br clear=all> | ||
| + | |||
| + | The group directory is now displayed under '''"Network addresses"'''. | ||
| + | <br> | ||
| + | The size of the storage space corresponds to the [[Quota in the network storage | Quota]] of the group directory. | ||
[[Datei:Netzlaufwerk_einbinden_Win_10_Gruppenverzeichnis_Speicherkapazität.PNG|links|mini|ohne|400px]] | [[Datei:Netzlaufwerk_einbinden_Win_10_Gruppenverzeichnis_Speicherkapazität.PNG|links|mini|ohne|400px]] | ||
<br clear=all> | <br clear=all> | ||
| − | Open the drive with a double click. In this example | + | Open the drive with a double click. In this example you can recognize it by the name '''<group>'''. |
| − | You can now store data for | + | You can now store data for shared viewing and editing in the group directory under '''"data"''' or make it accessible to others under '''"public"'''. |
| + | |||
| + | </bootstrap_panel> | ||
| + | |||
| + | <bootstrap_panel heading="Include main directory" color="info"> | ||
| + | As an alternative to integrating individual group directories, you can also connect to the main directory by default. From there you can access all group directories for which you have permission. | ||
| + | <br> | ||
| + | <br> | ||
| + | To do this, include the following directory: | ||
| + | <br> | ||
| + | <pre>\\fs-cifs.uni-paderborn.de\upb\groups</pre> | ||
| + | </bootstrap_panel> | ||
| + | |||
| + | <bootstrap_panel heading="Include scratch area" color="info"> | ||
| + | '''Department Scratch Area''' | ||
| + | <pre>\\fs-cifs.uni-paderborn.de\upb\scratch\departments\*</pre> | ||
| + | Replace '''*''' with the short name of your department scratch | ||
| + | <br> | ||
| + | <br> | ||
| − | + | '''Group Scratch Area''' | |
| − | + | <pre>\\fs-cifs.uni-paderborn.de\upb\scratch\groups\*</pre> | |
| + | Replace '''*''' with the short name of your group scratch. | ||
| + | <br> | ||
| + | <br> | ||
| − | == Troubleshooting == | + | '''Personal Scratch Area''' |
| − | If an error message ( | + | <pre>\\fs-cifs.uni-paderborn.de\upb\scratch\users\*\**</pre> |
| + | |||
| + | Replace '''*''' with the first letter of your username. Replace '''**''' with your username from your university account. | ||
| + | </bootstrap_panel> | ||
| + | </bootstrap_accordion> | ||
| + | |||
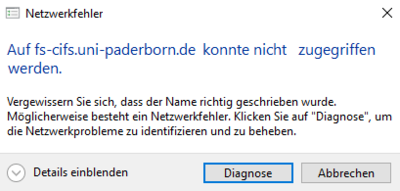
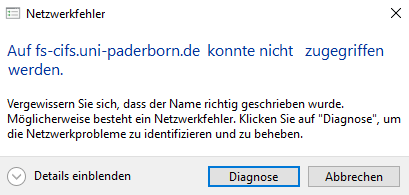
| + | ==Troubleshooting== | ||
| + | If an error message (see below) appears during the process, please follow the instructions in step 3 - "Establish a connection to the university's network". | ||
[[Datei:Netzlaufwerk_einbinden_Win_10_Fehlermeldung.PNG|links|mini|ohne|400px]] | [[Datei:Netzlaufwerk_einbinden_Win_10_Fehlermeldung.PNG|links|mini|ohne|400px]] | ||
<br clear=all> | <br clear=all> | ||
| − | + | == See also == | |
| − | == | + | * [[Netzwerkspeicher]] |
| − | * [[ | + | * [[Gruppenverwaltung Mitglied hinzufügen]] |
| − | |||
| − | * [[ | ||
| − | |||
| − | |||
Aktuelle Version vom 2. August 2024, 10:02 Uhr
The network storage available to you from the University of Paderborn can be integrated into Windows 10 as a so-called network drive.
Network drives are displayed directly next to your computer's hard drives, giving you quick and easy access to the additional storage:
- If you mount your personal network storage, you will be taken to your user or home directory.
- If you are a member of a university group with network storage and integrate it, you will be taken to the corresponding group directory.
Requirements[Bearbeiten | Quelltext bearbeiten]
- Home directory: If you want to use your personal network storage, it must be activated once via the service portal.
- Group Storage: The permission for the group storage. This is assigned by your area.
What needs to be done?[Bearbeiten | Quelltext bearbeiten]
- Connect to the Paderborn University network
- Mount personal network storage as a network drive
- Mount group network storage as network drives
Connect to the university network[Bearbeiten | Quelltext bearbeiten]
To mount a network drive in Windows 10, you must first make sure that your computer is connected to the university's network.
Do you work from outside the university? Are you on the way?
- First connect to the program OpenVPN with the university's VPN network
Are you on the university campus? You can connect to the university network as follows
- Via LAN cable to the Network Sockets
- Via the WLAN network Eduroam
- Via the WLAN network Webauth
Mount drive[Bearbeiten | Quelltext bearbeiten]
Include directory Windows 10
- Open Windows Explorer
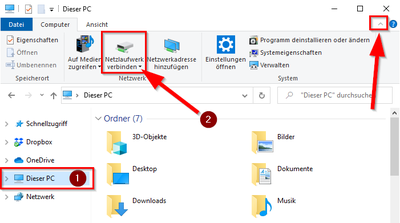
- Click "This PC" on the left edge
- Then click on Map network drive
- If you don't see the menu, you can expand it by clicking on the arrow.
Please enter the following data in the "Connect network drive" dialog window:
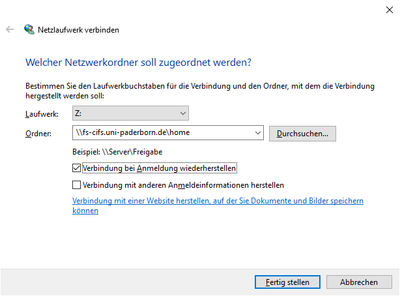
- Drive: Z: (or select any other unused drive letter)
- Folder:
\\fs-cifs.uni-paderborn.de\home
- Restore connection upon login: check mark (if desired)
- Connect using different credentials: leave unchecked
- Then confirm by clicking on Finish
A window with a password query may appear at this point

- Click "Use Another Account"
- Enter "AD\<username>" in the appropriate field
- Replace "<username>" with your university account
- Enter the password for your university account in the appropriate field
- Check the box for "Save login details"
- Click "OK" to finish
Your personal user directory will now be displayed under "Network addresses". You can recognize it by the name "Home".
The size of the storage space corresponds to your network storage quota Quota]].
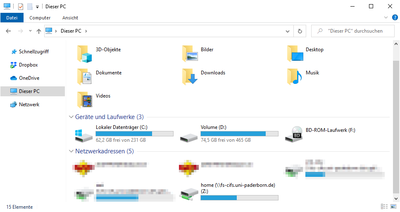
Open your network drive with a double click.
- You can store your own data under "data"
- You can make data accessible to other people under "public"
Include directory Windows 11
- Open Windows Explorer
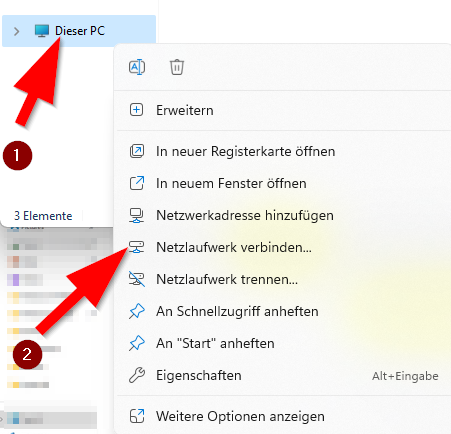
- Right-click on "This PC" on the left edge
- Then click "Map network drive" in the context menu
Please enter the following data in the "Connect network drive" dialog window:
- Drive: Z: (or select any other unused drive letter)
- Folder: Path for the network drive. Here, for example, is the home directory.
- Restore connection upon login: check mark (if desired)
- Connect using different credentials: leave unchecked
- Finally, click "Finish".
A window with a password query may appear at this point
- Click "Use Another Account"
- Enter "AD\<username>" in the appropriate field
- Replace "<username>" with your university account
- Enter the password for your university account in the appropriate field
- Check the box for "Save login details"
- Click "OK" to finish
The connected network drives will now be displayed under “This PC” in the Network addresses area.
Include user directory
Include the following directory:
\\fs-cifs.uni-paderborn.de\home
Your personal user directory will now be displayed under "Network addresses". You can recognize it by the name "Home".
The size of the storage space corresponds to your network storage quota Quota]].
Open your network drive with a double click.
- You can store your own data under "data"
- You can make data accessible to other people under "public"
Include group directory
If you want to integrate a group drive, you must be a member of the corresponding rights group.
Include the following directory:
\\fs-cifs.uni-paderborn.de\upb\groups\GROUP
- For GROUP use the lowercase short form of the group name
The group directory is now displayed under "Network addresses".
The size of the storage space corresponds to the Quota of the group directory.
Open the drive with a double click. In this example you can recognize it by the name <group>. You can now store data for shared viewing and editing in the group directory under "data" or make it accessible to others under "public".
Include main directory
As an alternative to integrating individual group directories, you can also connect to the main directory by default. From there you can access all group directories for which you have permission.
To do this, include the following directory:
\\fs-cifs.uni-paderborn.de\upb\groups
Include scratch area
Department Scratch Area
\\fs-cifs.uni-paderborn.de\upb\scratch\departments\*
Replace * with the short name of your department scratch
Group Scratch Area
\\fs-cifs.uni-paderborn.de\upb\scratch\groups\*
Replace * with the short name of your group scratch.
Personal Scratch Area
\\fs-cifs.uni-paderborn.de\upb\scratch\users\*\**
Replace * with the first letter of your username. Replace ** with your username from your university account.
Troubleshooting[Bearbeiten | Quelltext bearbeiten]
If an error message (see below) appears during the process, please follow the instructions in step 3 - "Establish a connection to the university's network".


