Jnk (Diskussion | Beiträge) |
|||
| (16 dazwischenliegende Versionen von 2 Benutzern werden nicht angezeigt) | |||
| Zeile 2: | Zeile 2: | ||
|origin=Zoom - Veranstaltung planen und anlegen | |origin=Zoom - Veranstaltung planen und anlegen | ||
|lang=en | |lang=en | ||
| − | |translated title=Zoom - | + | |translated title=Zoom - Plan and create meeting |
}} | }} | ||
| − | |||
| − | |||
| − | |||
| − | |||
| − | |||
| − | |||
| − | |||
| − | |||
| − | |||
| − | |||
| − | |||
| − | |||
| − | == | + | ==Quick Guide== |
| − | To create | + | To create Zoom meetings, you should use a registered Zoom campus license and have already logged in to Zoom. Don't have a Zoom campus license yet? Then click here for [[Zoom – Registrierung|Zoom - Registration]]. |
| − | + | Information on how to register can be found here [[Zoom - Anmeldung|Zoom – Login]]. | |
| − | |||
<bootstrap_accordion> | <bootstrap_accordion> | ||
| − | <bootstrap_panel heading=" | + | <bootstrap_panel heading="In the browser" color="info"> |
| − | + | [[Datei:Screenshot Zoom MeetingPlanen.png|links|mini|ohne|500px]] | |
| + | <br clear=all> | ||
| + | * After registering, click on “Meetings” in the navigation on the left. | ||
| + | * There you either directly select “Schedule a new meeting” or alternatively click on the “Schedule a meeting” button at the top of the screen. | ||
| + | * You can now make various settings for your meeting; recommendations for this can be found in this article under “Additional Settings”. | ||
| + | <br clear=all> | ||
| + | [[Datei:Screenshot Zoom CoModerator.png|links|mini|ohne|500px]] | ||
| + | <br clear=all> | ||
| + | * A scheduled meeting will be displayed in the “Meetings” section. Here you can also start or delete the sessions directly. | ||
| + | * Here you will also find the invitation links that can be sent to your participants to join (“copy invitation”). | ||
| + | </bootstrap_panel> | ||
| + | |||
| + | <bootstrap_panel heading="In the app" color="info"> | ||
| + | [[Datei:Screenshot Zoom MeetingAnlegen.png|links|mini|ohne|500px]] | ||
| + | <br clear=all> | ||
| + | * After signing in, you can use the desktop app to manage your Zoom meetings in a similar way to the browser. You can use the buttons to start a “New Meeting” directly or “Plan” future meetings. | ||
| + | * You can now make various settings for your meeting; recommendations for this can be found in this article under “Additional Settings”. | ||
| + | * You can find a scheduled meeting under the “Meetings” tab at the top of the screen. Here you can also start or delete the sessions directly. | ||
| + | * Here you will also find the invitation links that can be sent to your participants to join (“copy invitation”). | ||
| + | </bootstrap_panel> | ||
| + | <bootstrap_panel heading="More settings" color="info"> | ||
| + | Here you can make various settings for your meeting. | ||
| + | [[File:Screenshot Zoom MeetingAnlegen 01.png|rechts|mini|ohne|500px]] | ||
| + | <br clear=all> | ||
| + | * '''Repeat Meeting:''' If this is a “Recurring Meeting”, select “No Specific Time” to use this meeting at any time. | ||
<br> | <br> | ||
| − | + | * '''Meeting ID:''' Preferably select the automatically generated meeting ID here. | |
| − | + | * '''Security:''' You should always enable two of these three security features. | |
| − | + | ** '''Passcode:''' For security reasons, please use a passcode. Participants either follow an invitation link directly or alternatively require the meeting ID and the identification code entered here. | |
| + | ** '''Waiting Room:''' Enable the waiting room so that people can only join the session after approval by the host / moderator / co-moderator. | ||
| + | ** '''Only "authorized users" can participate after registering for Zoom:''' Only use this option if you know for sure that all invited participants have a Zoom license themselves. | ||
| + | * '''Encryption:''' | ||
| + | ** '''Advanced encryption:''' Transport encryption is active by default, i.e. strangers cannot read without authorization, but the US company Zoom theoretically has access to the content of the conference. | ||
| + | ** '''End-to-end encryption:''' Enable this “E2E” encryption to ensure confidentiality of the conversation. Activation comes with some limitations; You can find more information about end-to-end encryption in the article “Zoom – Activate encryption (end-to-end)”. | ||
| + | <br clear=all> | ||
<br> | <br> | ||
| − | + | [[Datei:Screenshot Zoom MeetingAnlegen 02.png|rechts|mini|ohne|500px]] | |
<br clear=all> | <br clear=all> | ||
| + | * '''Video:''' Switch on the hosts' or participants' cameras when they join | ||
| + | * '''Audio:''' With end-to-end end-to-end encryption, only the obligatory computer audio is preselected. With normal, extended encryption, you can also allow dial-in by telephone. | ||
| + | * '''Calendar:''' Optional embedding of created meetings in installed/used software. (Details: Link Zoom instructions) | ||
| + | * '''Advanced options:''' Here we only recommend muting participants when joining and setting alternative moderators if necessary. | ||
| + | ** Mute participants when joining: If possible, all microphones should be switched off, especially in meetings with many people. Participants can unmute themselves at any time. | ||
| + | ** Alternative moderators: Co-moderators can be entered here when planning sessions if they do not want to be authorized until the current session. | ||
| − | |||
| − | |||
| − | |||
| − | |||
</bootstrap_panel> | </bootstrap_panel> | ||
| + | </bootstrap_accordion> | ||
| + | |||
| + | == Invite participants == | ||
| + | You can send invitation links generated by Zoom to your participants, which you can use to take part in a conference directly. Alternatively, you can always take part in a Zoom conference by providing your meeting ID and passcode. | ||
| + | * First go to the “Meetings” tab at the top of the screen. | ||
| + | * Here you can copy the invitation link and distribute it to participants (e.g. via email). | ||
| + | * Alternatively, you can also copy a text template as an “invitation”. | ||
| − | + | == Moderation rights == | |
| − | + | ===Alternative Hosts=== | |
| − | [[Datei:Zoom | + | If you are not in charge of the meeting alone or are creating it for other people, you can create '''"alternative hosts"''' when you create the meeting. |
| + | <br> | ||
| + | '''Requirements:''' Alternative hosts must have their own account via the Zoom campus license of the University of Paderborn. | ||
| + | <br> | ||
| + | To do this, follow these steps: | ||
| + | [[Datei:Screenshot Zoom MeetingAnlegen 03.png|links|mini|ohne|450px|Show options]] | ||
<br> | <br> | ||
| − | * | + | * In the Options area, click '''<span style="color:blue">Einblenden</span>'''. |
<br clear=all> | <br clear=all> | ||
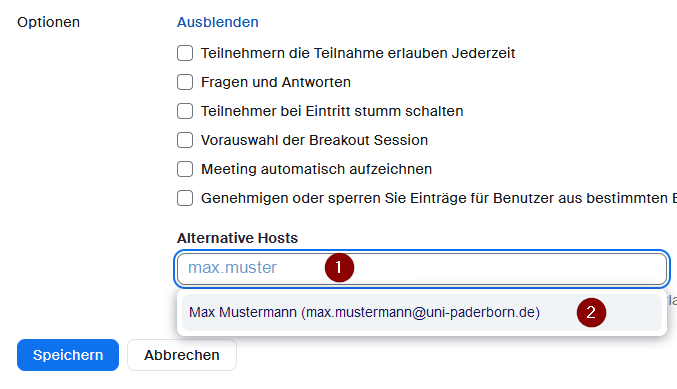
| − | [[Datei:Zoom | + | [[Datei:Screenshot Zoom MeetingAnlegen 04.png|links|mini|ohne|450px|Search people]] |
<br> | <br> | ||
| − | * | + | * You can add people under '''"Alternative Hosts"'''. |
| − | * | + | * You can search for ''First Name Last Name'' and ''Preferred Email Address'' here. (1) |
| − | + | * Click on one of the results to select the person. (2) | |
<br clear=all> | <br clear=all> | ||
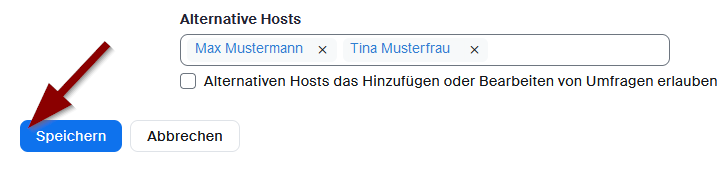
| − | [[Datei:Zoom | + | [[Datei:Screenshot Zoom MeetingAnlegen 05.png|links|mini|ohne|450px|Save changes]] |
<br> | <br> | ||
| − | * | + | *You can add multiple people this way. |
| + | * Click '''"Save"''' to apply your changes. | ||
<br clear=all> | <br clear=all> | ||
| − | + | ===Co-Host=== | |
| − | + | If you are in a Zoom meeting, you can give moderation rights to other participants. | |
| − | + | <br> | |
| − | + | '''Requirements:''' None - Any participant in an ongoing Zoom meeting can be named a co-host. | |
<br> | <br> | ||
| − | |||
| − | |||
| − | [[Datei:Zoom | + | [[Datei:Screenshot Zoom MeetingAnlegen 06.png|links|mini|ohne|450px|appoint co-host]] |
<br> | <br> | ||
| − | * | + | * Open the participant list. |
| − | + | * Click on the three dots <code>...</code> next to the name of the person you want | |
| + | *Click '''"Make Co-Host"'''. | ||
<br clear=all> | <br clear=all> | ||
| − | + | ===Other=== | |
| − | + | * In Zoom there is the option to either appoint alternative moderators when a meeting is created or to extend the moderation rights during a meeting to another person (co-host / co-moderator). | |
| − | + | * Alternative moderators also need a valid Zoom campus license in order to set up, open and fully control meetings. | |
| − | + | * Once a meeting is opened, these rights can also be passed on to people who do not have a license. This means that your license holder may first have to open the meeting room for you and then transfer the rights to you (click on Person -> “More” -> “Appoint moderator” in the participant overview). | |
| − | + | * The co-moderation function makes it possible to share moderation privileges with other people so that they can, for example, manage the administrative part of the meeting. The rights must be actively assigned during a meeting. There is no limit to the number of co-moderators who can participate in a meeting or web seminar. | |
| − | == | + | * Co-moderators cannot start a meeting independently. Only people with moderation rights can do this. |
| − | |||
| − | |||
| − | |||
| − | |||
| − | |||
| − | |||
| − | |||
| − | |||
| − | * Alternative | ||
| − | * | ||
| − | * | ||
| − | * Co- | ||
== Security and privacy == | == Security and privacy == | ||
| − | Please choose all your zoom settings carefully! | + | Please choose all your zoom settings carefully! You can find important information about this here [[Zoom - Sicherheit und Datenschutz]]. |
| − | + | == See also == | |
| − | == | ||
* [[Zoom - Allgemeine Informationen]] | * [[Zoom - Allgemeine Informationen]] | ||
* [[Zoom – Registrierung]] | * [[Zoom – Registrierung]] | ||
| − | * [[Zoom]] - Overview of all Zoom | + | * [[Zoom]] - Overview of all articles on Zoom |
Aktuelle Version vom 6. September 2024, 22:55 Uhr
Quick Guide[Bearbeiten | Quelltext bearbeiten]
To create Zoom meetings, you should use a registered Zoom campus license and have already logged in to Zoom. Don't have a Zoom campus license yet? Then click here for Zoom - Registration. Information on how to register can be found here Zoom – Login.
In the browser

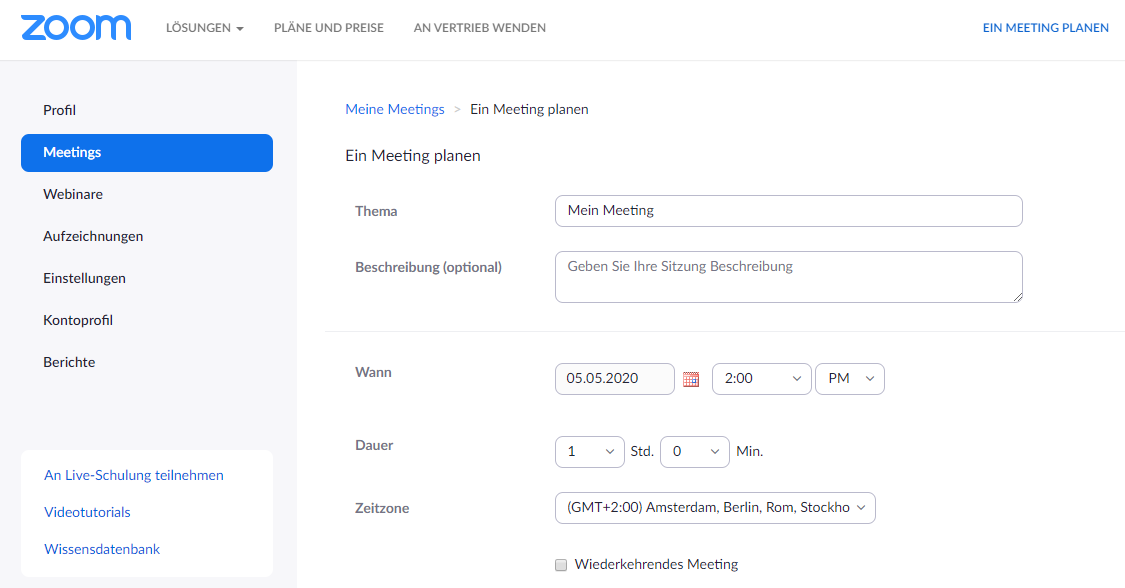
- After registering, click on “Meetings” in the navigation on the left.
- There you either directly select “Schedule a new meeting” or alternatively click on the “Schedule a meeting” button at the top of the screen.
- You can now make various settings for your meeting; recommendations for this can be found in this article under “Additional Settings”.

- A scheduled meeting will be displayed in the “Meetings” section. Here you can also start or delete the sessions directly.
- Here you will also find the invitation links that can be sent to your participants to join (“copy invitation”).
In the app
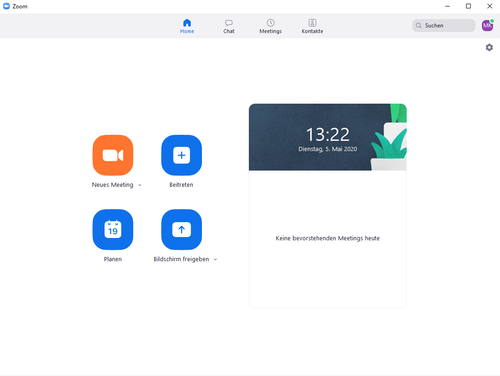
- After signing in, you can use the desktop app to manage your Zoom meetings in a similar way to the browser. You can use the buttons to start a “New Meeting” directly or “Plan” future meetings.
- You can now make various settings for your meeting; recommendations for this can be found in this article under “Additional Settings”.
- You can find a scheduled meeting under the “Meetings” tab at the top of the screen. Here you can also start or delete the sessions directly.
- Here you will also find the invitation links that can be sent to your participants to join (“copy invitation”).
More settings
Here you can make various settings for your meeting.
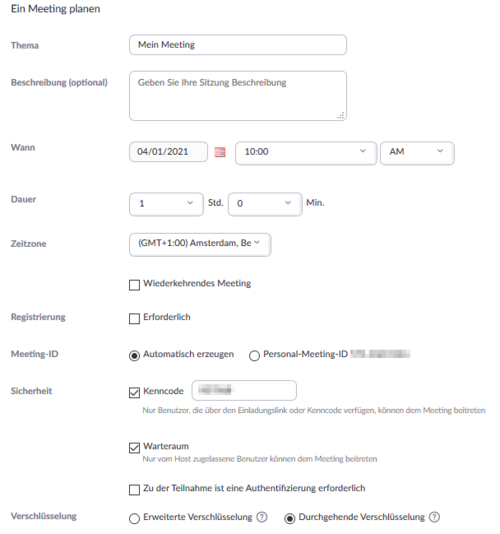
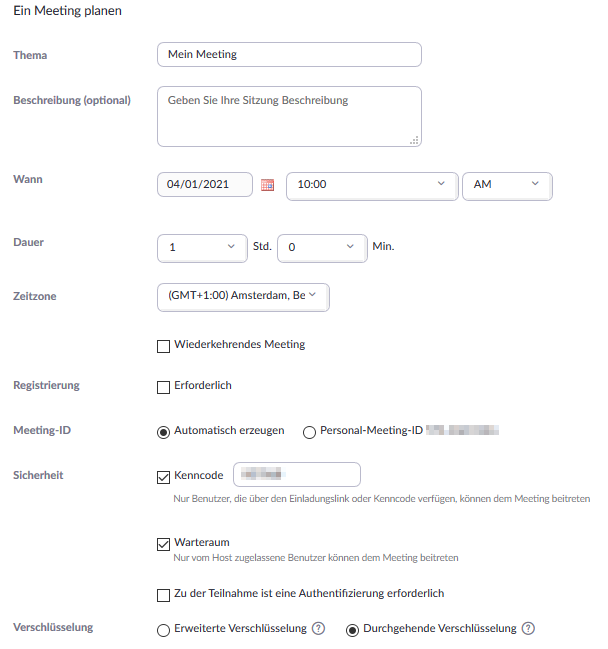
- Repeat Meeting: If this is a “Recurring Meeting”, select “No Specific Time” to use this meeting at any time.
- Meeting ID: Preferably select the automatically generated meeting ID here.
- Security: You should always enable two of these three security features.
- Passcode: For security reasons, please use a passcode. Participants either follow an invitation link directly or alternatively require the meeting ID and the identification code entered here.
- Waiting Room: Enable the waiting room so that people can only join the session after approval by the host / moderator / co-moderator.
- Only "authorized users" can participate after registering for Zoom: Only use this option if you know for sure that all invited participants have a Zoom license themselves.
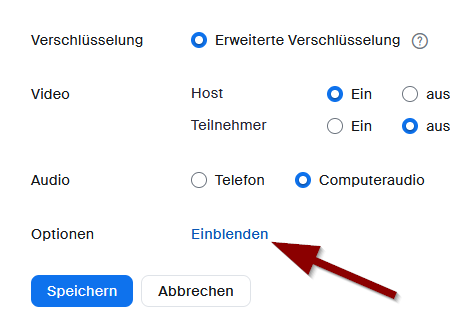
- Encryption:
- Advanced encryption: Transport encryption is active by default, i.e. strangers cannot read without authorization, but the US company Zoom theoretically has access to the content of the conference.
- End-to-end encryption: Enable this “E2E” encryption to ensure confidentiality of the conversation. Activation comes with some limitations; You can find more information about end-to-end encryption in the article “Zoom – Activate encryption (end-to-end)”.
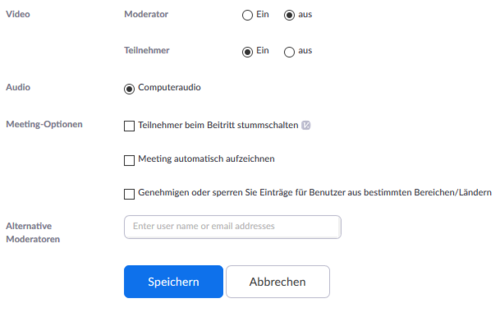
- Video: Switch on the hosts' or participants' cameras when they join
- Audio: With end-to-end end-to-end encryption, only the obligatory computer audio is preselected. With normal, extended encryption, you can also allow dial-in by telephone.
- Calendar: Optional embedding of created meetings in installed/used software. (Details: Link Zoom instructions)
- Advanced options: Here we only recommend muting participants when joining and setting alternative moderators if necessary.
- Mute participants when joining: If possible, all microphones should be switched off, especially in meetings with many people. Participants can unmute themselves at any time.
- Alternative moderators: Co-moderators can be entered here when planning sessions if they do not want to be authorized until the current session.
Invite participants[Bearbeiten | Quelltext bearbeiten]
You can send invitation links generated by Zoom to your participants, which you can use to take part in a conference directly. Alternatively, you can always take part in a Zoom conference by providing your meeting ID and passcode.
- First go to the “Meetings” tab at the top of the screen.
- Here you can copy the invitation link and distribute it to participants (e.g. via email).
- Alternatively, you can also copy a text template as an “invitation”.
Moderation rights[Bearbeiten | Quelltext bearbeiten]
Alternative Hosts[Bearbeiten | Quelltext bearbeiten]
If you are not in charge of the meeting alone or are creating it for other people, you can create "alternative hosts" when you create the meeting.
Requirements: Alternative hosts must have their own account via the Zoom campus license of the University of Paderborn.
To do this, follow these steps:
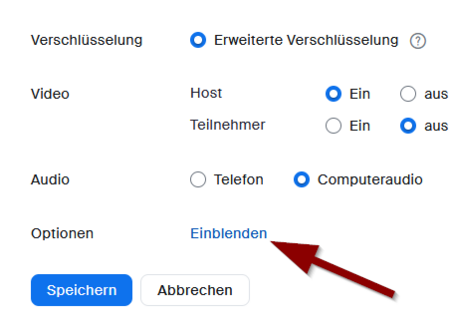
- In the Options area, click Einblenden.

- You can add people under "Alternative Hosts".
- You can search for First Name Last Name and Preferred Email Address here. (1)
- Click on one of the results to select the person. (2)

- You can add multiple people this way.
- Click "Save" to apply your changes.
Co-Host[Bearbeiten | Quelltext bearbeiten]
If you are in a Zoom meeting, you can give moderation rights to other participants.
Requirements: None - Any participant in an ongoing Zoom meeting can be named a co-host.
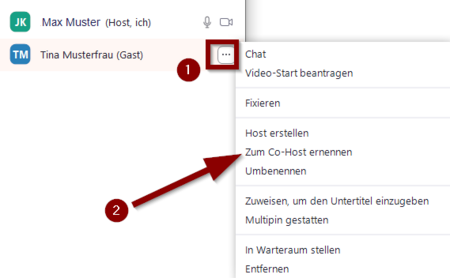
- Open the participant list.
- Click on the three dots
...next to the name of the person you want - Click "Make Co-Host".
Other[Bearbeiten | Quelltext bearbeiten]
- In Zoom there is the option to either appoint alternative moderators when a meeting is created or to extend the moderation rights during a meeting to another person (co-host / co-moderator).
- Alternative moderators also need a valid Zoom campus license in order to set up, open and fully control meetings.
- Once a meeting is opened, these rights can also be passed on to people who do not have a license. This means that your license holder may first have to open the meeting room for you and then transfer the rights to you (click on Person -> “More” -> “Appoint moderator” in the participant overview).
- The co-moderation function makes it possible to share moderation privileges with other people so that they can, for example, manage the administrative part of the meeting. The rights must be actively assigned during a meeting. There is no limit to the number of co-moderators who can participate in a meeting or web seminar.
- Co-moderators cannot start a meeting independently. Only people with moderation rights can do this.
Security and privacy[Bearbeiten | Quelltext bearbeiten]
Please choose all your zoom settings carefully! You can find important information about this here Zoom - Sicherheit und Datenschutz.
See also[Bearbeiten | Quelltext bearbeiten]
- Zoom - Allgemeine Informationen
- Zoom - Registrierung (für Veranstalter*innen)
- Zoom - Overview of all articles on Zoom


