Exchange einrichten in iOS/en
| (Eine dazwischenliegende Version desselben Benutzers wird nicht angezeigt) | |||
| Zeile 17: | Zeile 17: | ||
==Step-by-step instructions== | ==Step-by-step instructions== | ||
=== Create new account === | === Create new account === | ||
| − | [[ | + | [[Datei:Eduroam-ios-8.png|80px]] |
Open the Settings app. | Open the Settings app. | ||
<br clear=all> | <br clear=all> | ||
<br> | <br> | ||
| − | [[ | + | [[Datei:Exchange-ios-06.png|links|mini|ohne|450px|Add account]] |
<br> | <br> | ||
* Select '''Mail'''. | * Select '''Mail'''. | ||
| Zeile 28: | Zeile 28: | ||
<br clear=all>> | <br clear=all>> | ||
| − | [[ | + | [[Datei:Exchange_einrichten_in_iOS_01.png|links|mini|ohne|450px|Add account]] |
<br> | <br> | ||
| − | * Click ''"Add Account"''. | + | * Click '''"Add Account"'''. |
<br clear=all> | <br clear=all> | ||
| − | [[ | + | [[Datei:Exchange_einrichten_in_iOS_02.png|links|mini|ohne|450px|Select Exchange]] |
<br> | <br> | ||
* Select '''"Microsoft Exchange"'''. | * Select '''"Microsoft Exchange"'''. | ||
| Zeile 40: | Zeile 40: | ||
=== Enter data === | === Enter data === | ||
Enter the following data in the fields: | Enter the following data in the fields: | ||
| − | [[ | + | [[Datei:Exchange_einrichten_in_iOS_03.png|links|mini|ohne|450px|enter data]] |
<br> | <br> | ||
* '''Email:''' Your preferred email address | * '''Email:''' Your preferred email address | ||
| Zeile 46: | Zeile 46: | ||
* '''Description:''' Any | * '''Description:''' Any | ||
<br> | <br> | ||
| − | * Then click '''"Next"''. | + | * Then click '''"Next"'''. |
<br clear=all> | <br clear=all> | ||
| − | [[ | + | [[Datei:Exchange_einrichten_in_iOS_05.png|links|mini|ohne|450px|Configure manually]] |
<br> | <br> | ||
* Click '''Configure manually'''. | * Click '''Configure manually'''. | ||
| Zeile 55: | Zeile 55: | ||
Set up the mailbox manually with the following data: | Set up the mailbox manually with the following data: | ||
| − | [[ | + | [[Datei:Exchange_einrichten_in_iOS_04.png|links|mini|ohne|450px|Settings]] |
<br> | <br> | ||
* '''Email''': Your preferred email address | * '''Email''': Your preferred email address | ||
| Zeile 64: | Zeile 64: | ||
* '''Description:''' Any | * '''Description:''' Any | ||
<br> | <br> | ||
| − | * Then click '''"Next"''. | + | * Then click '''"Next"'''. |
<br clear=all> | <br clear=all> | ||
| − | [[ | + | [[Datei:Exchange_einrichten_in_iOS_06.png|links|mini|ohne|450px|Exchange functions]] |
<br> | <br> | ||
* Select which content you want to sync via Exchange. | * Select which content you want to sync via Exchange. | ||
* Select at least '''"Mail"''' - The other content is optional. | * Select at least '''"Mail"''' - The other content is optional. | ||
| − | * Click ''' | + | * Click '''"Save"''' to finish. |
<br clear=all> | <br clear=all> | ||
==See also== | ==See also== | ||
* [[Exchange]] | * [[Exchange]] | ||
Aktuelle Version vom 17. September 2024, 21:18 Uhr
Die deutsche Version finden Sie auf der Seite Exchange einrichten in iOS
ATTENTION: The Outlook app for iOS is blocked for use because login data and mailbox contents are cached on external servers at Microsoft USA and this contradicts the GDPR. |
This guide explains how to set up an Exchange account on iPads and iPhones. Emails can be managed via Apple's Mail app. The setup of other apps can differ significantly.
What needs to be done?[Bearbeiten | Quelltext bearbeiten]
- Connect to internet
- Set up an Exchange account
- Define settings for emails, contacts and calendars
Step-by-step instructions[Bearbeiten | Quelltext bearbeiten]
Create new account[Bearbeiten | Quelltext bearbeiten]
 Open the Settings app.
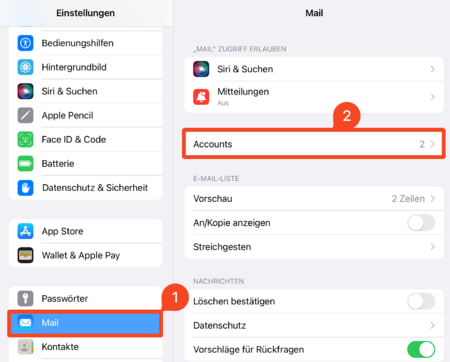
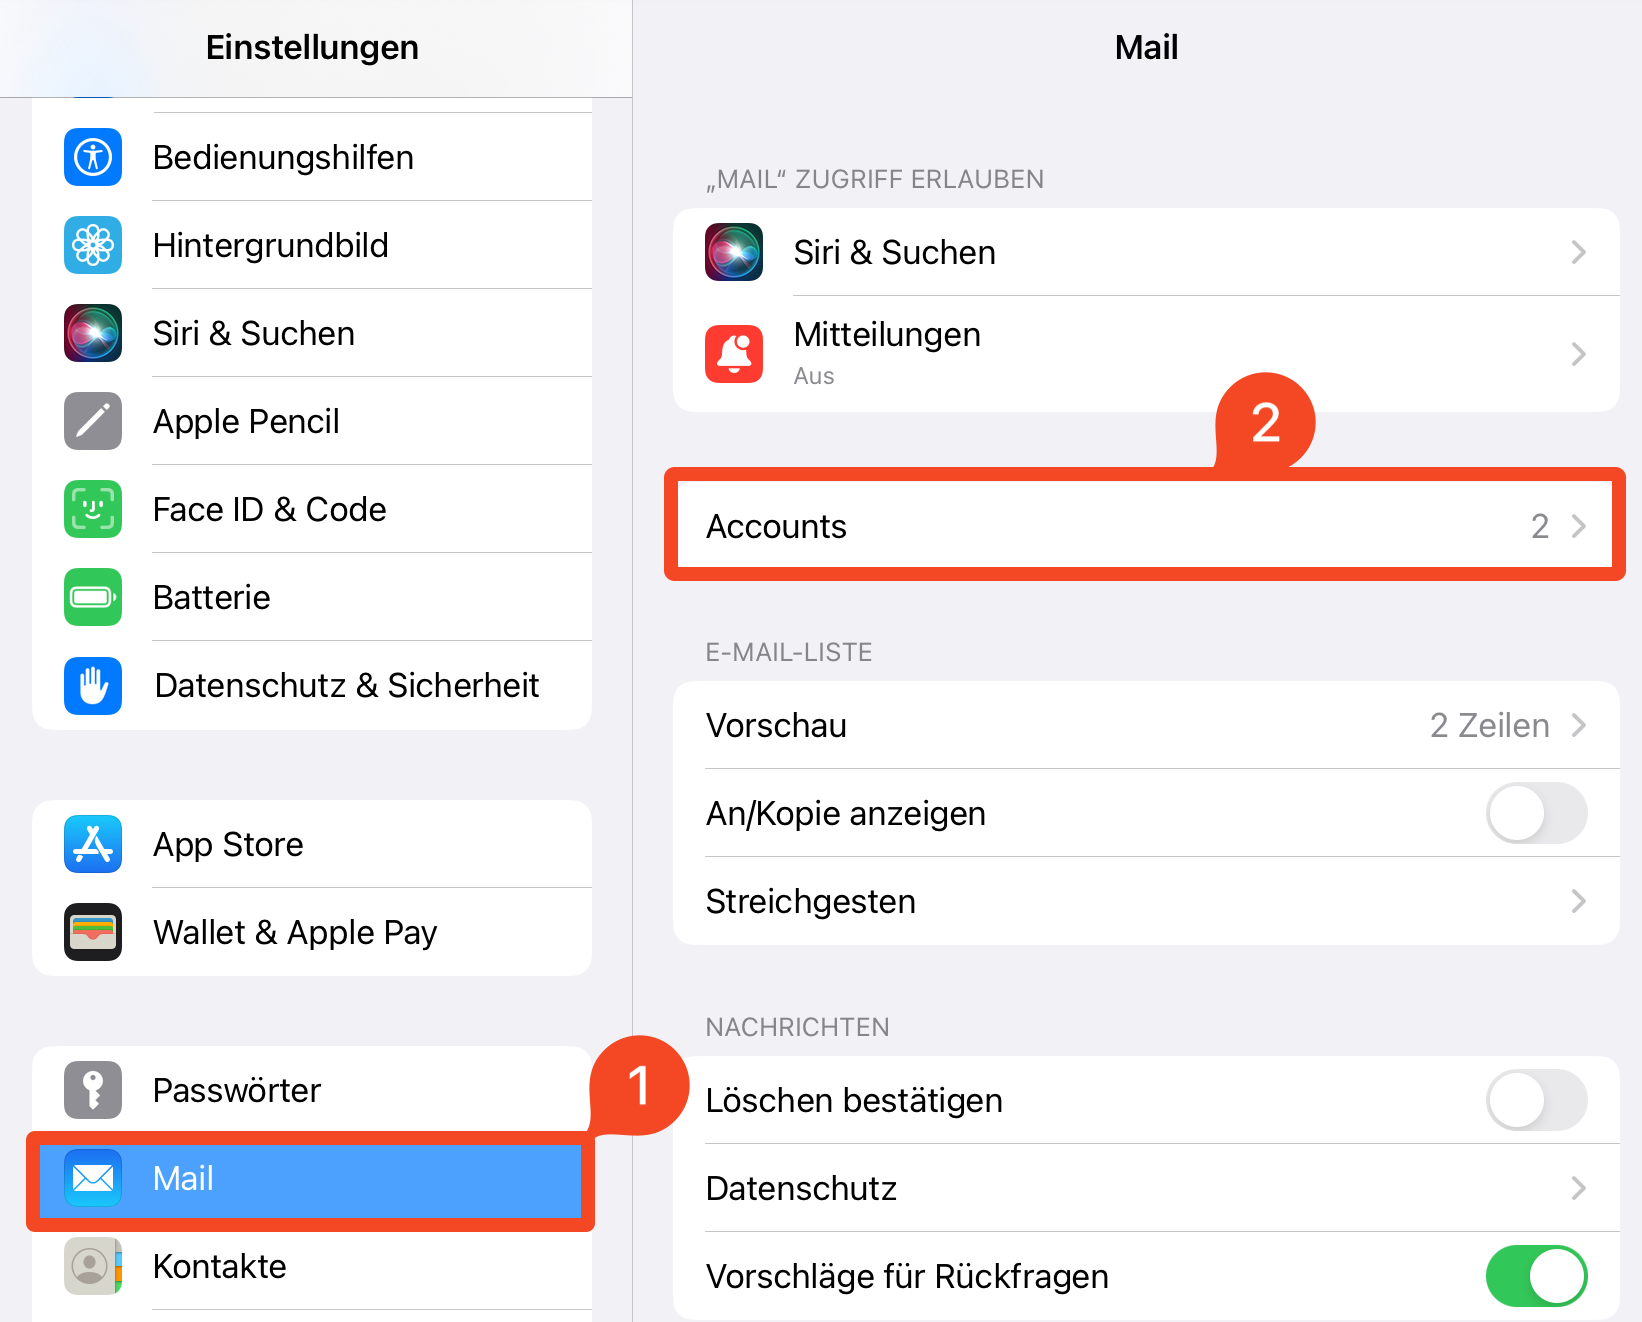
- Select Mail.
- Click on Accounts.
>
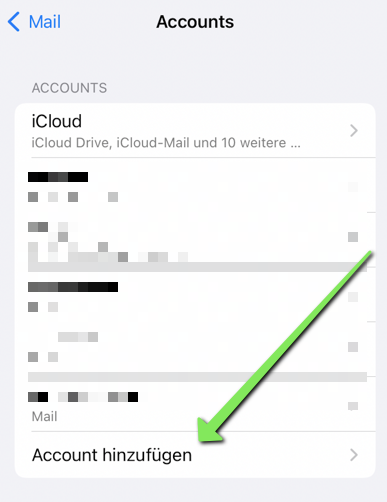
- Click "Add Account".
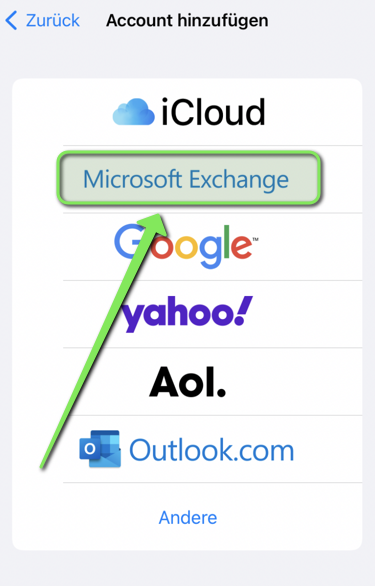
- Select "Microsoft Exchange".
Enter data[Bearbeiten | Quelltext bearbeiten]
Enter the following data in the fields:
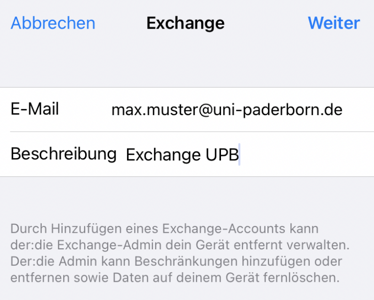
- Email: Your preferred email address
- Password: Password for the university account
- Description: Any
- Then click "Next".
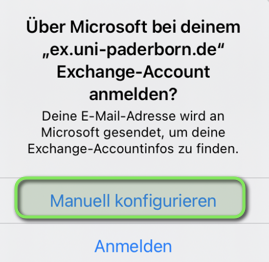
- Click Configure manually.
Set up the mailbox manually with the following data:
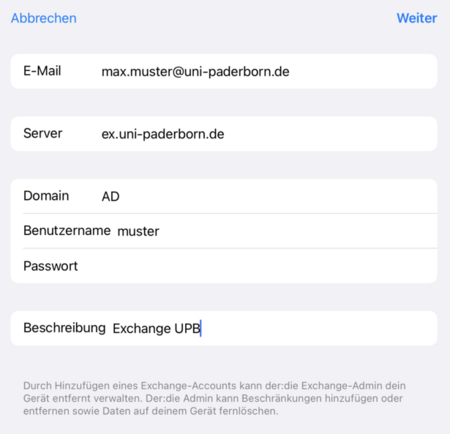
- Email: Your preferred email address
- Server: ex.uni-paderborn.de
- Domain: AD
- Username: Username for the university account
- Password: Password for the university account
- Description: Any
- Then click "Next".
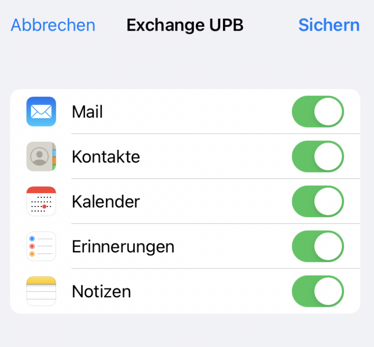
- Select which content you want to sync via Exchange.
- Select at least "Mail" - The other content is optional.
- Click "Save" to finish.
