| Zeile 5: | Zeile 5: | ||
}} | }} | ||
| − | The Sciebo client allows you to share documents without | + | The Sciebo client allows you to share documents without accessing the website. It makes it easier to keep documents in the cloud up-to-date, as you can open and edit documents directly from your hard drive, and any changes are immediately synchronized with the cloud folder.<br> |
| − | + | General information about Sciebo can be found under [[Sciebo General Information]]. | |
| − | == | + | == Usage Notes == |
| − | Sciebo | + | Sciebo can be used to store sensitive data or to share such files. In both cases, this data should be appropriately encrypted before uploading. The following articles explain everything you should consider when storing sensitive data in your cloud:<br> |
| − | * [[ | + | * [[Using File Encryption]] |
| − | * [[ | + | * [[Sharing Data Securely]] |
| − | * [[ | + | * [[Storing Data Securely]] |
<br> | <br> | ||
| − | + | Sciebo does not offer integrated end-to-end encryption. This must be done using additional programs if necessary. | |
| − | |||
== First Steps == | == First Steps == | ||
| − | If you | + | If you haven't yet applied for Sciebo, you must do so before you can download and use the client. Instructions can be found under [[Applying for Sciebo]].<br> |
| − | After | + | After applying for Sciebo, you can download and install the desktop client. <br> |
| − | To do this, download the appropriate file for your operating system (Windows, MacOS, Linux) from https:// | + | To do this, download the appropriate file for your operating system (Windows, MacOS, Linux) from https://hochschulcloud.nrw/de/download/index.html under the Nextcloud client versions (see image), launch it, and follow the installation steps. |
| + | [[File:Sciebo Using the Sciebo Client Installing Nextcloud.png|left|mini|without|450px]] | ||
| + | <br clear=all> | ||
| − | == Windows == | + | == Use on Windows == |
| − | === | + | === Setup === |
| − | After | + | [[File:Sciebo Using the Sciebo Client 01.png|left|mini|without|450px|Select "Uni Paderborn" from the list.]] |
| − | Username: <Uniaccount>@uni-paderborn.de | + | <br clear=all> |
| − | + | *After installing the Sciebo desktop client, open it. You will now be asked to select the server address. Here, search for "Uni Paderborn." | |
| − | + | *You will then be asked to log in to Sciebo in your internet browser to authorize yourself. | |
| − | [[File: | + | *To do this, use the account you created when applying for the service. |
| − | + | *Username: <Uniaccount>@uni-paderborn.de | |
| − | + | <br clear=all> | |
| − | + | [[File:Sciebo Using the Sciebo Client 02.png|left|mini|without|450px|You will normally be automatically redirected to the browser. Otherwise, simply click on the window. | |
| + | <br clear=all> | ||
| + | Open the browser menu and click '''authorize'''. | ||
<br clear=all> | <br clear=all> | ||
| − | + | [[File:Sciebo Using the Sciebo Client 03.png|left|mini|without|450px]] | |
| − | |||
| − | [[File: | ||
<br clear=all> | <br clear=all> | ||
| − | + | Now, as above, enter your username in the following format: <Uniaccount>@uni-paderborn.de and your university password. | |
| − | |||
<br clear=all> | <br clear=all> | ||
| − | + | ||
| − | + | * In the next step, you can specify which folders or items on your device should be synchronized by the client. If you have already used Sciebo on your computer, the client may find an old folder. By default, Sciebo will then create a new folder to avoid deleting or overwriting any old files. If you are sure that all files in this previous folder are obsolete or still available in Sciebo (in a newer version), you can also select the option to remove the local folder. <br> | |
| − | + | * If you are unsure, stick with the default setting "Keep local files" and check the old folder after setup and then manually remove it. | |
| − | |||
| − | * If the | ||
<br clear=all> | <br clear=all> | ||
| − | |||
| − | |||
| − | |||
| − | |||
| − | |||
| − | |||
| + | [[File:Sciebo Using the Sciebo Client 04.png|left|mini|without|450px|1: Here you will find your local folder. 2: Here you can synchronize manually. 3: Here you will find your account and, among other things, the option to log out.]] | ||
| + | <br clear=all> | ||
| + | * After you have successfully connected, the client will now automatically synchronize the folders and files you selected (marked with a check mark) at any time, as the client starts up with the system. You can change this in the settings under "General" if you do not want this to happen. | ||
| + | * In the "Activity" tab, you can check whether file synchronization is working and when it last occurred, or if there are any problems. <br> | ||
<br clear=all> | <br clear=all> | ||
| − | |||
| − | |||
| − | |||
| − | |||
| − | |||
| − | ==Android == | + | == Using the Sciebo Client on MacOS == |
| + | === Setup === | ||
| + | [[File:Sciebo Using the Sciebo Client Installing Nextcloud.png|left|mini|without|450px]] | ||
| + | [[File:Sciebo Client MacOS 01.png|left|mini|without|450px]] | ||
| + | Select the MacOS version from the Nextcloud versions. Download it and start the installation. | ||
| + | <br clear=all> | ||
| + | [[File:Sciebo Client MacOS 02.png|left|mini|without|450px]] | ||
| + | By default, "Macintosh HD" is selected as the volume on which the client will be installed. | ||
| + | <br clear=all> | ||
| + | [[File:Sciebo Client MacOS 03.png|left|mini|without|300px]] | ||
| + | Enter your password to install the program. | ||
| + | <br clear=all> | ||
| + | [[File:Sciebo Client MacOS 04.png|left|mini|without|450px]] | ||
| + | Let the program install. Once the installation is complete, you can close the installation wizard. | ||
| + | <br clear=all> | ||
| + | [[File:Sciebo Client MacOS 05.png|left|mini|without|300px]] | ||
| + | Allow the client to access your data. | ||
| + | <br clear=all> | ||
| + | [[File:Sciebo Client MacOS 06.png|left|mini|without|450px]] | ||
| + | When you open the client, first select "Uni Paderborn" from the list. Then click "Next." Your internet browser should open automatically, where you will then need to authorize the client once with your Sciebo login credentials. | ||
| + | <br clear=all> | ||
| + | [[File:Sciebo Using the Sciebo Client 03.png|left|mini|without|450px]] | ||
| + | Log in here with your Sciebo credentials. | ||
| + | <br clear=all> | ||
| + | [[File:Sciebo Client MacOS 07.png|left|mini|without|450px]] | ||
| + | The client will be automatically added to your favorites during installation. If you do not want this, you can manually remove it later. | ||
| + | <br clear=all> | ||
| + | == Use on Android == | ||
* Download the Sciebo app from the '''Google Play Store'''. | * Download the Sciebo app from the '''Google Play Store'''. | ||
| − | * | + | * Log in with your Sciebo account: |
| − | ** Username: < | + | ** Username: <Uniaccount>@uni-paderborn.de <br> |
| − | ** Password: < | + | ** Password: <Your chosen password> <br> |
| − | ==iOS/iPadOS == | + | == Use on iOS/iPadOS == |
* Download the Sciebo app from the '''App Store'''. | * Download the Sciebo app from the '''App Store'''. | ||
| − | * | + | * Log in with your Sciebo account: |
| − | ** Username: < | + | ** Username: <Uniaccount>@uni-paderborn.de <br> |
| − | ** Password: < | + | ** Password: <Your chosen password> <br> |
| − | |||
== See also == | == See also == | ||
Version vom 24. September 2025, 11:14 Uhr
The Sciebo client allows you to share documents without accessing the website. It makes it easier to keep documents in the cloud up-to-date, as you can open and edit documents directly from your hard drive, and any changes are immediately synchronized with the cloud folder.
General information about Sciebo can be found under Sciebo General Information.
Usage Notes[Bearbeiten | Quelltext bearbeiten]
Sciebo can be used to store sensitive data or to share such files. In both cases, this data should be appropriately encrypted before uploading. The following articles explain everything you should consider when storing sensitive data in your cloud:
Sciebo does not offer integrated end-to-end encryption. This must be done using additional programs if necessary.
First Steps[Bearbeiten | Quelltext bearbeiten]
If you haven't yet applied for Sciebo, you must do so before you can download and use the client. Instructions can be found under Applying for Sciebo.
After applying for Sciebo, you can download and install the desktop client.
To do this, download the appropriate file for your operating system (Windows, MacOS, Linux) from https://hochschulcloud.nrw/de/download/index.html under the Nextcloud client versions (see image), launch it, and follow the installation steps.
Use on Windows[Bearbeiten | Quelltext bearbeiten]
Setup[Bearbeiten | Quelltext bearbeiten]
- After installing the Sciebo desktop client, open it. You will now be asked to select the server address. Here, search for "Uni Paderborn."
- You will then be asked to log in to Sciebo in your internet browser to authorize yourself.
- To do this, use the account you created when applying for the service.
- Username: <Uniaccount>@uni-paderborn.de
[[File:Sciebo Using the Sciebo Client 02.png|left|mini|without|450px|You will normally be automatically redirected to the browser. Otherwise, simply click on the window.
Open the browser menu and click authorize.
Now, as above, enter your username in the following format: <Uniaccount>@uni-paderborn.de and your university password.
- In the next step, you can specify which folders or items on your device should be synchronized by the client. If you have already used Sciebo on your computer, the client may find an old folder. By default, Sciebo will then create a new folder to avoid deleting or overwriting any old files. If you are sure that all files in this previous folder are obsolete or still available in Sciebo (in a newer version), you can also select the option to remove the local folder.
- If you are unsure, stick with the default setting "Keep local files" and check the old folder after setup and then manually remove it.
- After you have successfully connected, the client will now automatically synchronize the folders and files you selected (marked with a check mark) at any time, as the client starts up with the system. You can change this in the settings under "General" if you do not want this to happen.
- In the "Activity" tab, you can check whether file synchronization is working and when it last occurred, or if there are any problems.
Using the Sciebo Client on MacOS[Bearbeiten | Quelltext bearbeiten]
Setup[Bearbeiten | Quelltext bearbeiten]

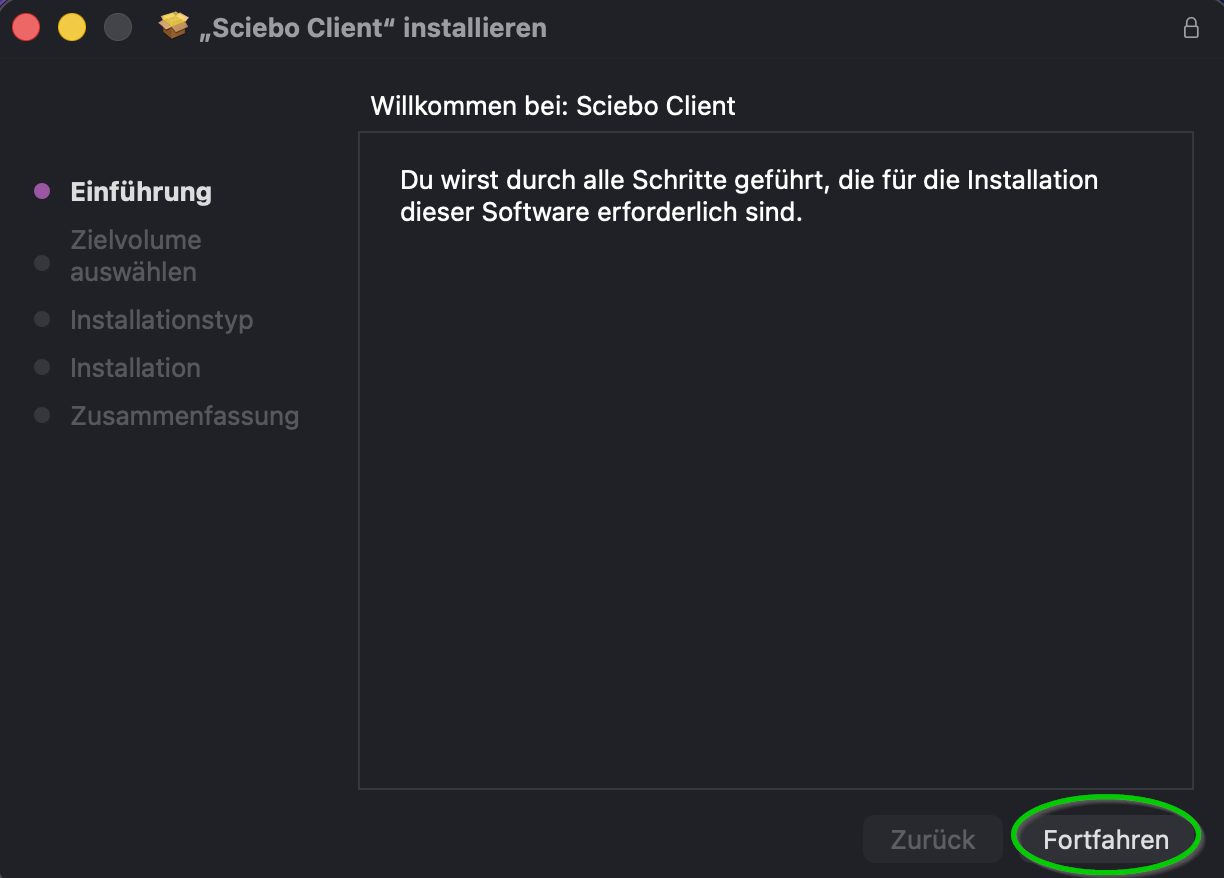
Select the MacOS version from the Nextcloud versions. Download it and start the installation.

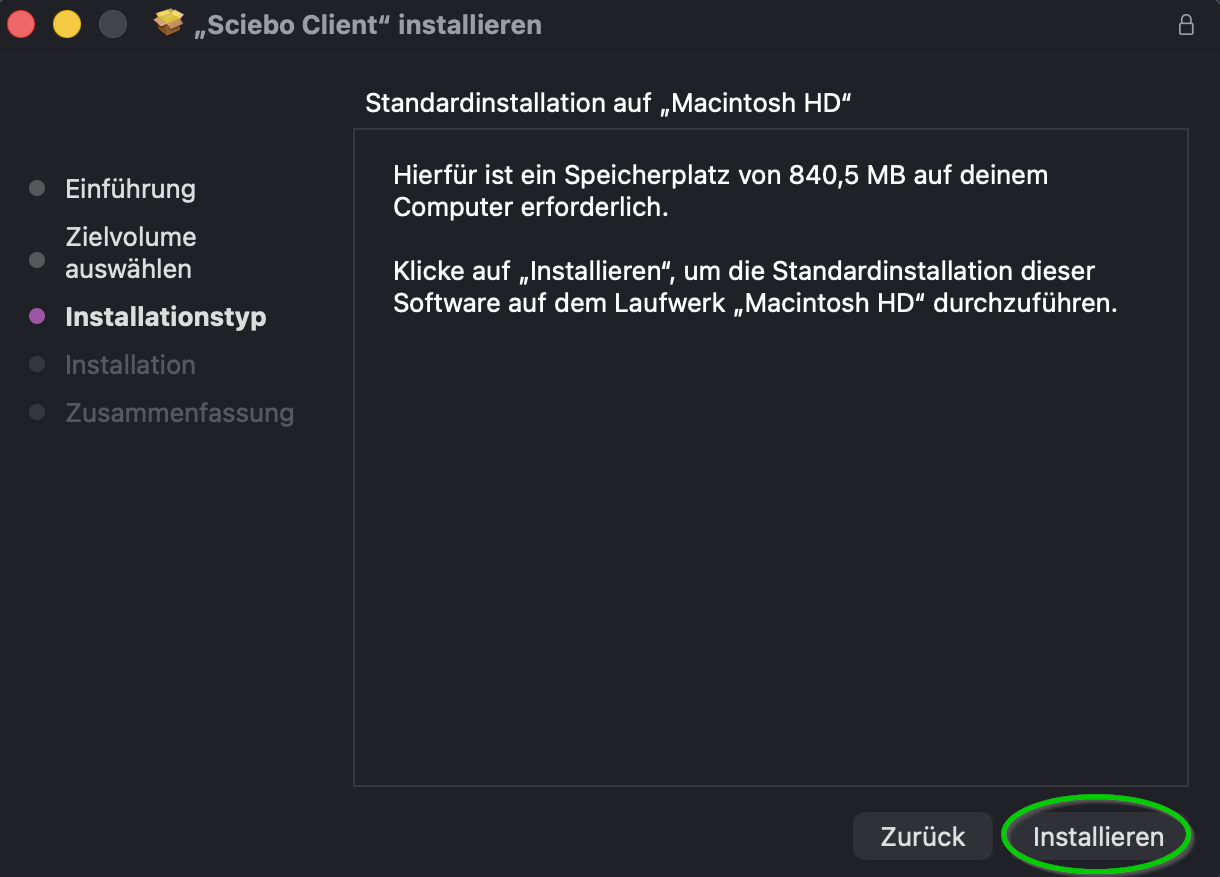
By default, "Macintosh HD" is selected as the volume on which the client will be installed.
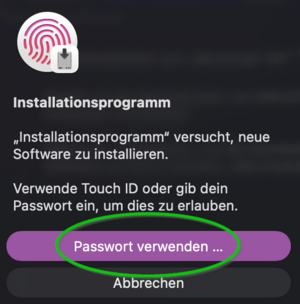
Enter your password to install the program.

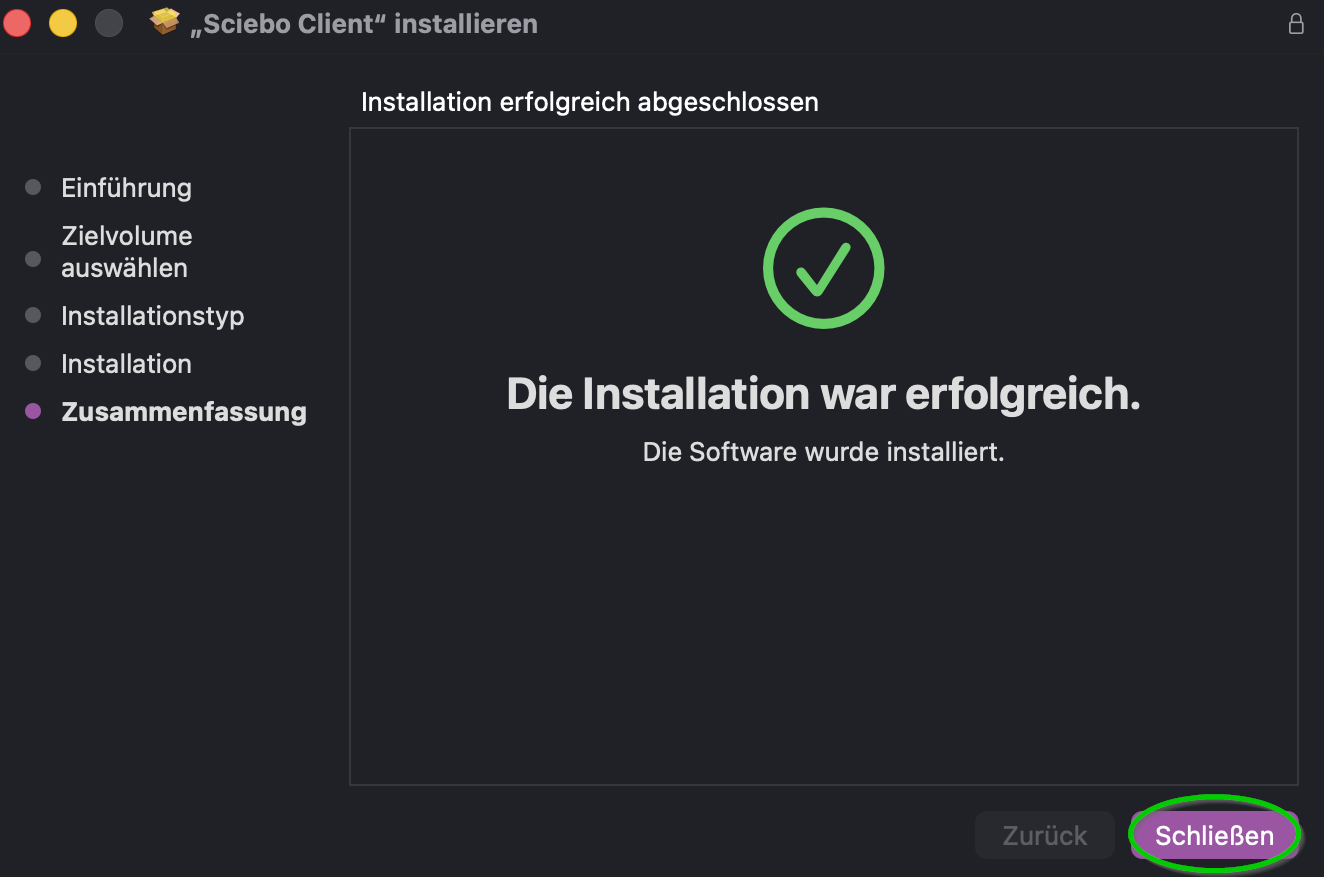
Let the program install. Once the installation is complete, you can close the installation wizard.
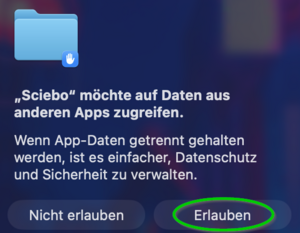
Allow the client to access your data.
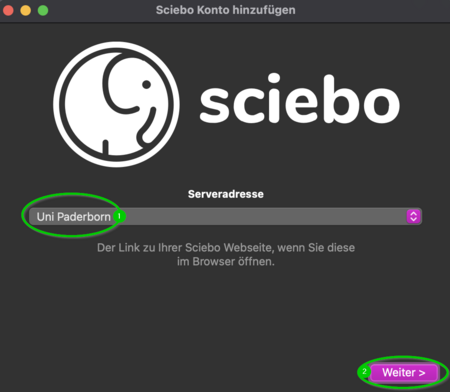
When you open the client, first select "Uni Paderborn" from the list. Then click "Next." Your internet browser should open automatically, where you will then need to authorize the client once with your Sciebo login credentials.
Log in here with your Sciebo credentials.
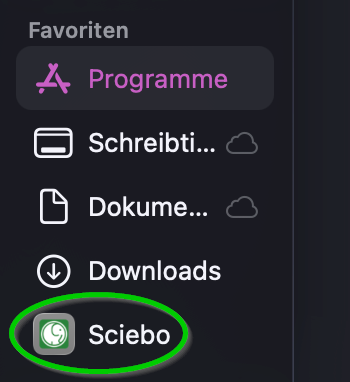
The client will be automatically added to your favorites during installation. If you do not want this, you can manually remove it later.
Use on Android[Bearbeiten | Quelltext bearbeiten]
- Download the Sciebo app from the Google Play Store.
- Log in with your Sciebo account:
- Username: <Uniaccount>@uni-paderborn.de
- Password: <Your chosen password>
- Username: <Uniaccount>@uni-paderborn.de
Use on iOS/iPadOS[Bearbeiten | Quelltext bearbeiten]
- Download the Sciebo app from the App Store.
- Log in with your Sciebo account:
- Username: <Uniaccount>@uni-paderborn.de
- Password: <Your chosen password>
- Username: <Uniaccount>@uni-paderborn.de
See also[Bearbeiten | Quelltext bearbeiten]
Sciebo
File Encryption


