Jnk (Diskussion | Beiträge) (Die Seite wurde neu angelegt: „{{translated page |origin=Eduroam unter MacOS |lang=en |translated title=eduroam on macOS }} This tutorial describes how to set up the Wi-Fi eduroam on macOS.…“) |
|||
| (32 dazwischenliegende Versionen von 2 Benutzern werden nicht angezeigt) | |||
| Zeile 2: | Zeile 2: | ||
|origin=Eduroam unter MacOS | |origin=Eduroam unter MacOS | ||
|lang=en | |lang=en | ||
| − | |translated title=eduroam on macOS | + | |translated title=Setup eduroam on macOS |
}} | }} | ||
| − | |||
| + | <!-- Hinweis für den Zertifikatswechsel bei den Radius-Server - Aktuell auskommentiert und kann bei Bedarf eingeblendet werden | ||
| + | {{Fingerprint_Radiuszertifikat-en}} | ||
| + | --> | ||
| + | |||
| + | This tutorial describes how to set up the Wi-Fi Eduroam on macOS. | ||
== Step-by-step description== | == Step-by-step description== | ||
| + | |||
| + | == What needs to be done? == | ||
| + | * Create a new network certificate in the service portal. | ||
| + | * Set up Eduroam with the new network certificate. | ||
| + | * If necessary, remove the Webauth network from the preferred networks of your device. | ||
| + | |||
| + | == Step-by-step instructions == | ||
=== Create network certificate === | === Create network certificate === | ||
| − | + | To use Eduroam you need a network certificate at the University of Paderborn. In the first step we have to create and download this. | |
| − | : | + | : The '''"Webauth"''' network can be used for this process. “Webauth” is only intended for this setup process and will log you out again after a short time. |
<br> | <br> | ||
| − | + | Go to the [http://sp.upb.de service portal] and log in with your university account. | |
<br clear=all> | <br clear=all> | ||
| − | [[Datei: | + | [[Datei:Eduroam-unter-android-3.png|links|mini|350px|]] |
<br> | <br> | ||
| − | * | + | * Open the "Netzwerkeinstellungen" under "Benutzerverwaltung". |
| + | <br clear=all> | ||
| + | |||
| + | |||
<br clear=all> | <br clear=all> | ||
| − | [[Datei: | + | |
| + | [[Datei:Eduroam-unter-android-4.png|links|mini|ohne|350px]] | ||
<br> | <br> | ||
| − | * | + | * Click '''"Neues Zertifikat erstellen"'''. |
<br clear=all> | <br clear=all> | ||
| − | [[Datei: | + | |
| + | [[Datei:Netzwerkzertifikat-container-v1.png|links|mini|ohne|350px]] | ||
<br> | <br> | ||
| − | * | + | * Give the certificate a unique name (Ex: MacBook) |
| − | * | + | * Select '''"Version 1"''' as the file format. |
| + | * Then click on '''"Neues Zertifikat zusenden"'''. | ||
<br clear=all> | <br clear=all> | ||
| − | [[Datei: | + | |
| + | <bootstrap_accordion> | ||
| + | <bootstrap_panel heading="Version 1 or 2 - What's the difference?" color="info"> | ||
| + | The certificates are available for download in different container formats. The selected version is a recommendation that, in our experience, works well for this operating system. | ||
| + | * Version 1 is a TripleDES-SHA1 container | ||
| + | * Version 2 is an AES-256 container | ||
| + | AES-256 encryption is preferred for security reasons. Unfortunately, it is not yet supported by all operating systems. | ||
| + | |||
| + | </bootstrap_panel> | ||
| + | </bootstrap_accordion> | ||
| + | |||
| + | [[Datei:Netzwerkzertifikat-download.png|links|mini|ohne|350px]] | ||
<br> | <br> | ||
| − | * | + | * A new network certificate has been created for you. |
| − | * | + | * First copy the '''Importpasswort''' to the clipboard. |
| − | * | + | * Now click on '''"Netzwerkzerifkat herunterladen"'''. |
<br clear=all> | <br clear=all> | ||
| − | === | + | ===Install network certificate=== |
| + | [[Datei:Eduroam-unter-macos-07.png]] Open the certificate. | ||
| + | |||
[[Datei:Screenshot macOS cert-imp.png|links|mini|350px|]] | [[Datei:Screenshot macOS cert-imp.png|links|mini|350px|]] | ||
<br> | <br> | ||
| − | * | + | * Enter the import password for the certificate. |
| − | * | + | * We just copied it to the clipboard. |
| − | * | + | * Alternatively, we can type it from the service portal. |
| + | * We continue with '''"OK"'''. | ||
<br clear=all> | <br clear=all> | ||
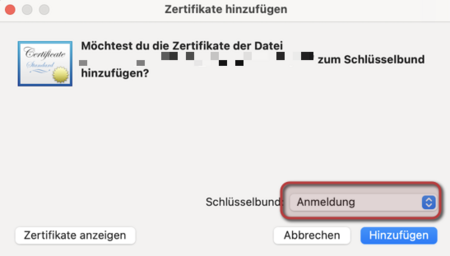
| − | === Eduroam | + | [[Datei:Screenshot macOS cert-imp-2.png|links|mini|ohne|450px|If this menu appears: select "'''Login"''' and '''"Add"'''.]] |
| + | <br clear=all> | ||
| + | |||
| + | === Set up Eduroam === | ||
[[Datei:Screenshot macOS wifi dropdown.png|links|mini|350px|]] | [[Datei:Screenshot macOS wifi dropdown.png|links|mini|350px|]] | ||
<br> | <br> | ||
| − | * | + | * The certificate is imported, now we can set up Eduroam. |
| − | * | + | * To do this, click on the WLAN symbol in the bar at the top and then continue by clicking on '''Eduroam'''. |
| + | <br clear=all> | ||
| + | |||
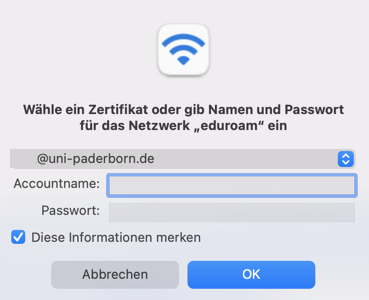
| + | [[Datei:Eduroam-unter-macos-03.png|links|mini|ohne|350px|macOS 12 Monterey and newer]] | ||
| + | <br> | ||
| + | * Use the first button to select your certificate - It is '''<username>@uni-paderborn.de'''. | ||
| + | * <span style="color:red">Be sure to leave the field for user name and password blank!</span> | ||
| + | * Then click '''"OK"'''. | ||
<br clear=all> | <br clear=all> | ||
| − | [[Datei: | + | |
| + | [[Datei:Eduroam-unter-macos-06.png|links|mini|ohne|350px|Zertifikat prüfen]] | ||
<br> | <br> | ||
| − | * | + | * Click on '''"Fortfahren"'''. |
| − | |||
| − | |||
| − | |||
<br clear=all> | <br clear=all> | ||
[[Datei:Screenshot macOS abfrage sicherheit.png|links|mini|350px|]] | [[Datei:Screenshot macOS abfrage sicherheit.png|links|mini|350px|]] | ||
| − | <br> | + | <br clear=all> |
| − | * MacOS | + | * MacOS now informs us that a change has been made to our computer. |
| − | * | + | * To confirm, enter the password for your Mac and then click '''Allow'''. |
| − | * | + | * This query can appear up to three times. Enter the password for your Mac every time. |
<br clear=all> | <br clear=all> | ||
| − | == | + | == Remove Wi-Fi Network Webauth == |
[[Datei:Screenshot macOS wifi dropdown setting.png|links|mini|350px|]] | [[Datei:Screenshot macOS wifi dropdown setting.png|links|mini|350px|]] | ||
<br> | <br> | ||
| − | * | + | * Now we're basically done - Eduroam is set up and ready to use. |
| − | * | + | * However, if you were using the Wi-Fi network Webauth on your Mac, you should definitely remove it, as otherwise problems may occur. |
| − | * | + | * To do this, click the Wi-Fi icon again at the top. |
| − | * | + | * Click on "System Preferences" > "Wi-Fi Settings..." to access the settings. |
<br clear=all> | <br clear=all> | ||
[[Datei:Screenshot macOS setting wifi.png|links|mini|350px|]] | [[Datei:Screenshot macOS setting wifi.png|links|mini|350px|]] | ||
<br> | <br> | ||
| − | * | + | * Here, we select Webauth from the list, click on the three dots next to it, and then click '''"Ignore this network..."'''. |
<br clear=all> | <br clear=all> | ||
[[Datei:Screenshot macOS setting wifi networks.png|links|mini|350px|]] | [[Datei:Screenshot macOS setting wifi networks.png|links|mini|350px|]] | ||
<br> | <br> | ||
| − | * | + | * Finally, we confirm once again that we want to ignore the Webauth network. This will prevent our device from connecting to Webauth instead of Eduroam. |
| − | |||
| − | |||
| − | |||
| − | |||
<br clear=all> | <br clear=all> | ||
| − | == | + | ==Troubleshooting== |
| − | + | If you are unable to connect to Eduroam as described above, follow these steps. | |
<br> | <br> | ||
| − | + | Remove the WLAN profiles for '''Eduroam''' and '''Webauth''' as described above. | |
<br clear=all> | <br clear=all> | ||
[[Datei:Eduroam-unter-MacOS-01.png|links|mini|ohne|350px]] | [[Datei:Eduroam-unter-MacOS-01.png|links|mini|ohne|350px]] | ||
<br> | <br> | ||
| − | * | + | * Click on the WiFi icon in the bar at the top. |
| − | * | + | * Select '''"Connect to another network..."'''. |
| + | <br clear=all> | ||
| + | |||
| + | [[Datei:Eduroam-unter-macos-05.png|links|mini|ohne|350px|macOS Monterey]] | ||
| + | <br clear=all> | ||
| + | * From macOS 12 - Monterey this may look different. | ||
| + | * Click on the WiFi icon. | ||
| + | * Click '''"Other Networks"'''. | ||
| + | * Click '''"Other..."'''. | ||
<br clear=all> | <br clear=all> | ||
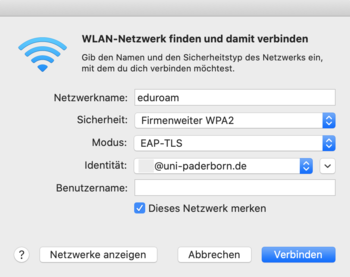
| − | + | Set up the network with the following settings: | |
<br> | <br> | ||
[[Datei:Eduroam-unter-MacOS-02.png|links|mini|ohne|350px]] | [[Datei:Eduroam-unter-MacOS-02.png|links|mini|ohne|350px]] | ||
| − | |||
| − | |||
| − | |||
| − | |||
| − | |||
| − | |||
<br clear=all> | <br clear=all> | ||
| − | + | * '''Network name:''' eduroam | |
| − | + | * '''Security:''' Company-wide WPA2 | |
| − | + | * '''Mode:''' EAP-TLS | |
| − | + | * '''Identity:''' Select your installed network certificate. The name ends with “@uni-paderborn.de”. | |
| − | * | + | * '''Username:''' Be sure to leave this field blank. |
| − | * | + | <br clear=all> |
| − | + | Now click on '''Verbinden'''. | |
| − | |||
| − | |||
| − | |||
| − | |||
| − | |||
| − | |||
| − | |||
| − | |||
| − | |||
| − | |||
| − | |||
Aktuelle Version vom 27. Oktober 2025, 11:27 Uhr
This tutorial describes how to set up the Wi-Fi Eduroam on macOS.
Step-by-step description[Bearbeiten | Quelltext bearbeiten]
What needs to be done?[Bearbeiten | Quelltext bearbeiten]
- Create a new network certificate in the service portal.
- Set up Eduroam with the new network certificate.
- If necessary, remove the Webauth network from the preferred networks of your device.
Step-by-step instructions[Bearbeiten | Quelltext bearbeiten]
Create network certificate[Bearbeiten | Quelltext bearbeiten]
To use Eduroam you need a network certificate at the University of Paderborn. In the first step we have to create and download this.
- The "Webauth" network can be used for this process. “Webauth” is only intended for this setup process and will log you out again after a short time.
Go to the service portal and log in with your university account.
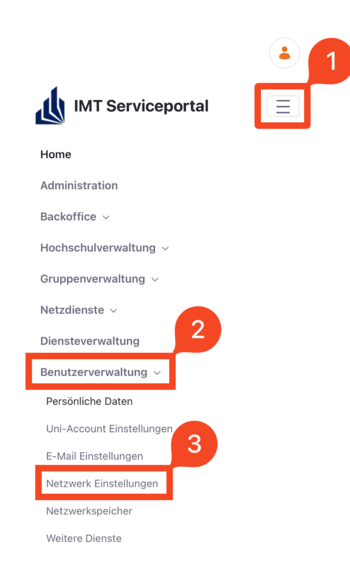
- Open the "Netzwerkeinstellungen" under "Benutzerverwaltung".
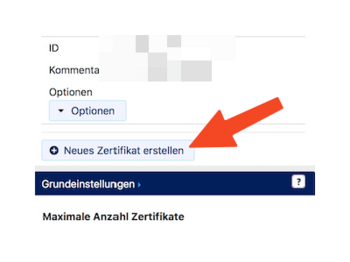
- Click "Neues Zertifikat erstellen".
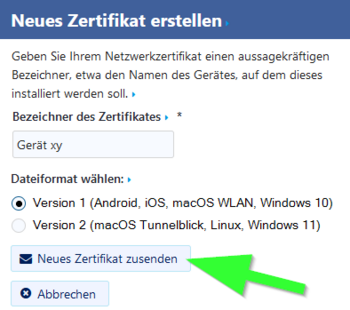
- Give the certificate a unique name (Ex: MacBook)
- Select "Version 1" as the file format.
- Then click on "Neues Zertifikat zusenden".
Version 1 or 2 - What's the difference?
The certificates are available for download in different container formats. The selected version is a recommendation that, in our experience, works well for this operating system.
- Version 1 is a TripleDES-SHA1 container
- Version 2 is an AES-256 container
AES-256 encryption is preferred for security reasons. Unfortunately, it is not yet supported by all operating systems.
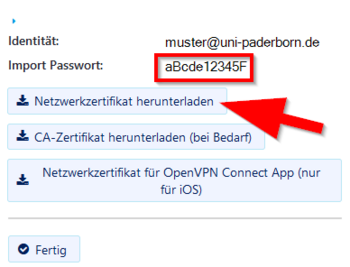
- A new network certificate has been created for you.
- First copy the Importpasswort to the clipboard.
- Now click on "Netzwerkzerifkat herunterladen".
Install network certificate[Bearbeiten | Quelltext bearbeiten]
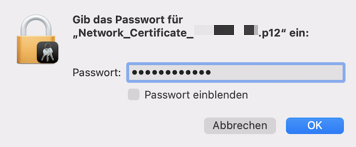
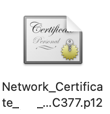 Open the certificate.
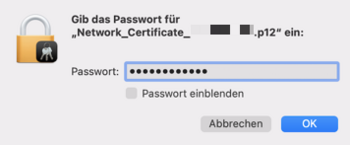
- Enter the import password for the certificate.
- We just copied it to the clipboard.
- Alternatively, we can type it from the service portal.
- We continue with "OK".
Set up Eduroam[Bearbeiten | Quelltext bearbeiten]
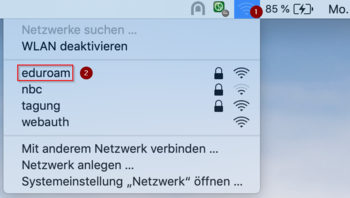
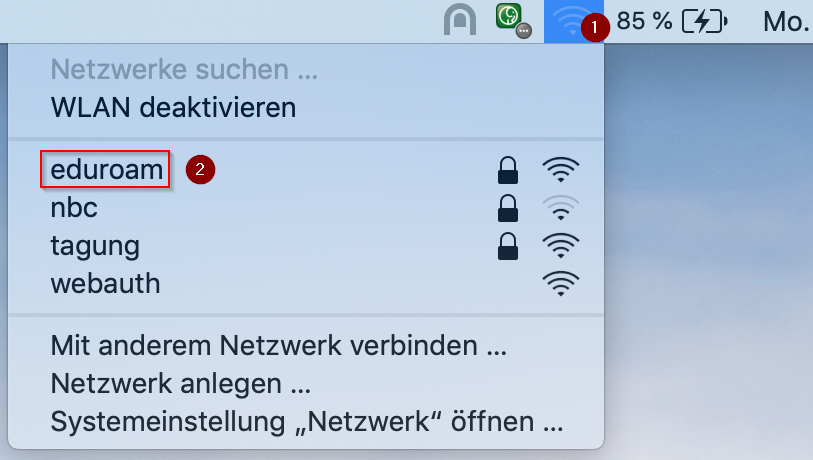
- The certificate is imported, now we can set up Eduroam.
- To do this, click on the WLAN symbol in the bar at the top and then continue by clicking on Eduroam.

- Use the first button to select your certificate - It is <username>@uni-paderborn.de.
- Be sure to leave the field for user name and password blank!
- Then click "OK".

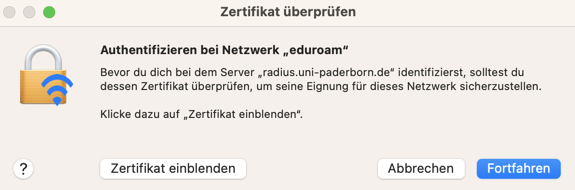
- Click on "Fortfahren".

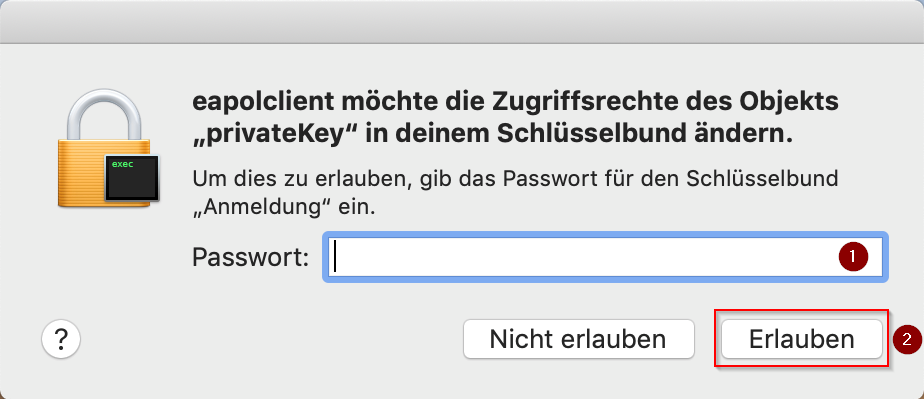
- MacOS now informs us that a change has been made to our computer.
- To confirm, enter the password for your Mac and then click Allow.
- This query can appear up to three times. Enter the password for your Mac every time.
Remove Wi-Fi Network Webauth[Bearbeiten | Quelltext bearbeiten]
- Now we're basically done - Eduroam is set up and ready to use.
- However, if you were using the Wi-Fi network Webauth on your Mac, you should definitely remove it, as otherwise problems may occur.
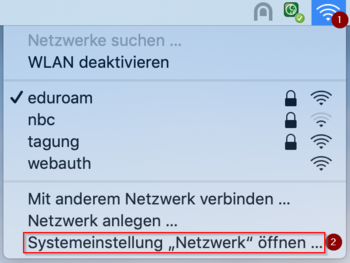
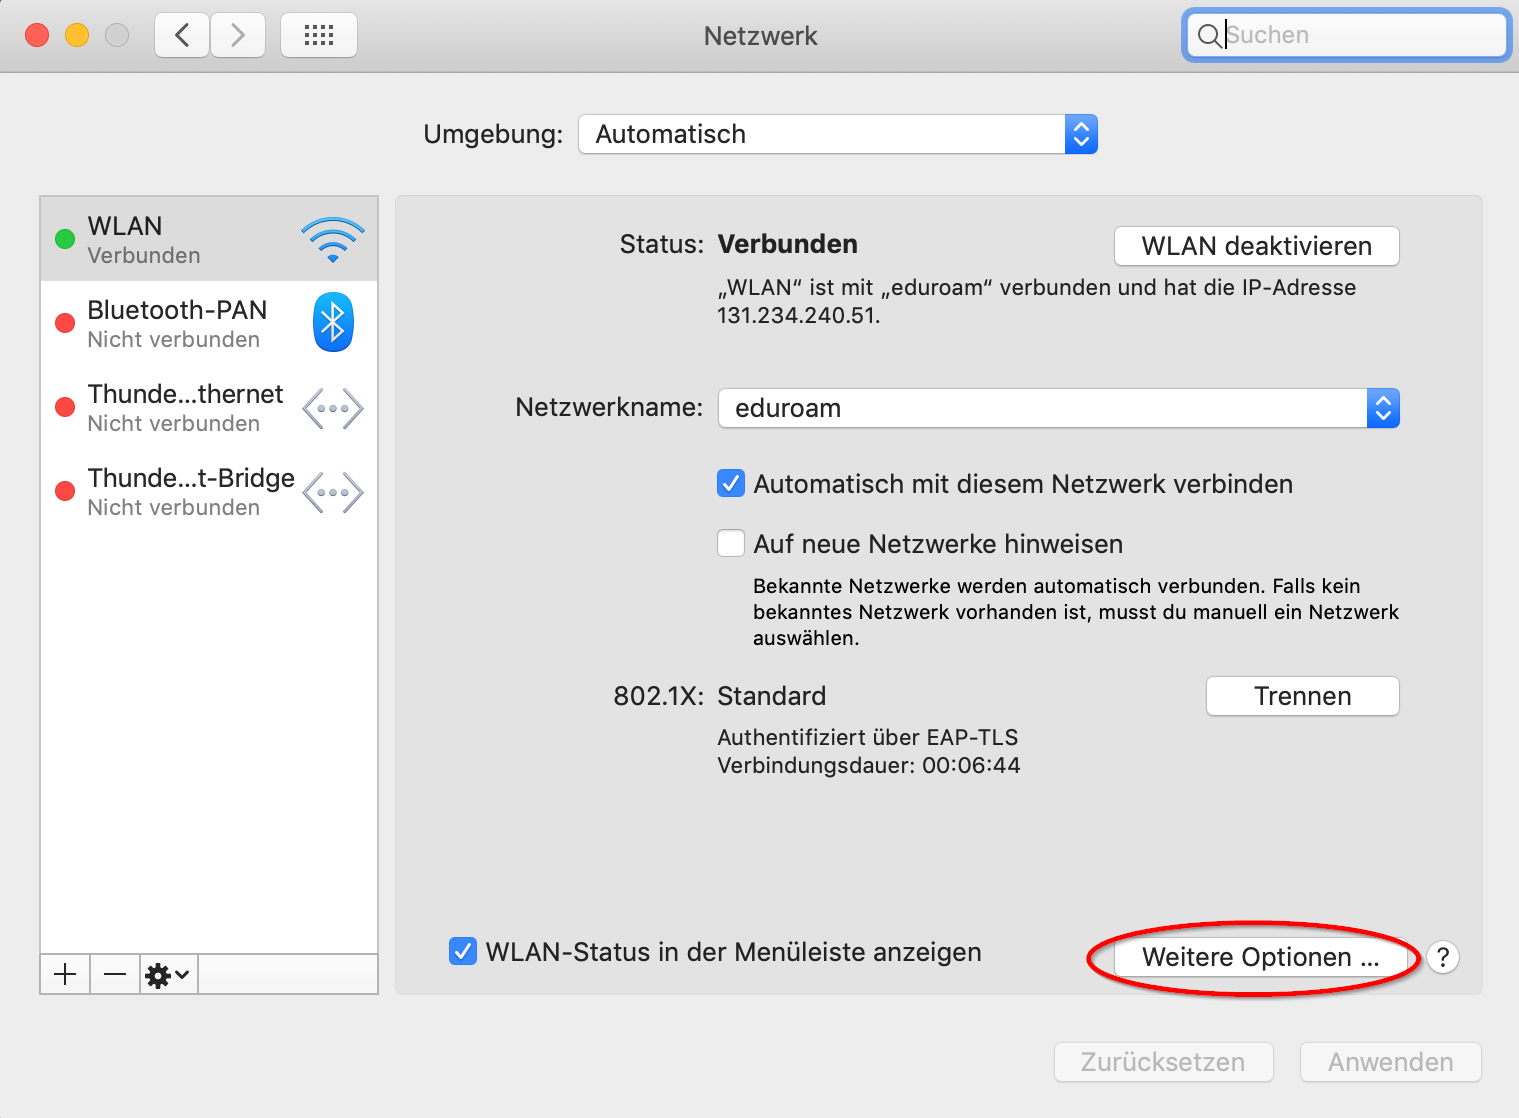
- To do this, click the Wi-Fi icon again at the top.
- Click on "System Preferences" > "Wi-Fi Settings..." to access the settings.
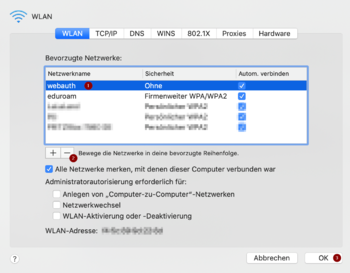
- Here, we select Webauth from the list, click on the three dots next to it, and then click "Ignore this network...".
- Finally, we confirm once again that we want to ignore the Webauth network. This will prevent our device from connecting to Webauth instead of Eduroam.
Troubleshooting[Bearbeiten | Quelltext bearbeiten]
If you are unable to connect to Eduroam as described above, follow these steps.
Remove the WLAN profiles for Eduroam and Webauth as described above.
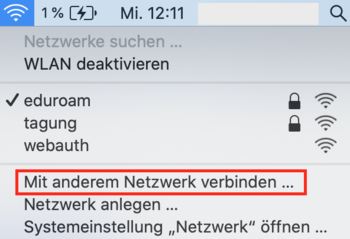
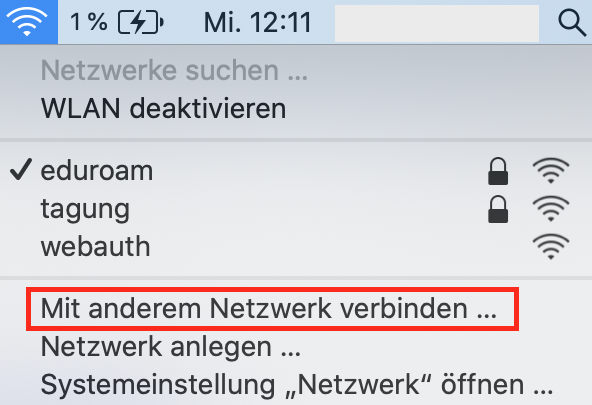
- Click on the WiFi icon in the bar at the top.
- Select "Connect to another network...".

- From macOS 12 - Monterey this may look different.
- Click on the WiFi icon.
- Click "Other Networks".
- Click "Other...".
Set up the network with the following settings:
- Network name: eduroam
- Security: Company-wide WPA2
- Mode: EAP-TLS
- Identity: Select your installed network certificate. The name ends with “@uni-paderborn.de”.
- Username: Be sure to leave this field blank.
Now click on Verbinden.


