Jnk (Diskussion | Beiträge) K (Jnk verschob die Seite Kurs: Materialien hinzufügen/en nach Course: Add materials, ohne dabei eine Weiterleitung anzulegen: Umlaut entfernt) |
Mfunk (Diskussion | Beiträge) K |
||
| (3 dazwischenliegende Versionen von 2 Benutzern werden nicht angezeigt) | |||
| Zeile 1: | Zeile 1: | ||
{{translated page | {{translated page | ||
| − | |origin=Kurs: Materialien | + | |origin=Kurs: Materialien hinzufuegen |
|lang=en | |lang=en | ||
|translated title=Course: Add materials | |translated title=Course: Add materials | ||
| − | }} | + | }}In a newly created PANDA course, the central section (1) – the main course area – contains a set number of empty topics and an Announcements Forum (2). By enabling the ''Edit mode'' function (3), you can add and adjust content in this section. |
| − | |||
| − | |||
| − | In a newly created PANDA course, the | ||
[[Datei:Materialien hinzufügen.png|zentriert|miniatur|530x530px|Figure 1]] | [[Datei:Materialien hinzufügen.png|zentriert|miniatur|530x530px|Figure 1]] | ||
| − | == | + | == Announcements Forum == |
| − | + | The Announcements Forum (2) is automatically generated in every course. Only users with course management rights (e.g. teachers or tutors) can post messages here. Each course can only have one Announcements Forum. It is useful for sharing information about specific sessions, for example. | |
| − | The | + | [[Datei:PANDA Ankündigungsforum.png|links|mini|650px]] |
| − | + | In the ''Announcements'' block, the most recent posts are displayed. By default, all course participants are automatically subscribed to this forum. | |
| − | |||
| − | |||
| − | |||
| − | |||
| − | |||
| − | |||
| − | |||
| − | |||
| − | |||
| − | |||
| − | |||
| − | |||
| − | [[Datei: | ||
| − | |||
| − | |||
| − | |||
| − | |||
| − | |||
| − | |||
| − | |||
| − | |||
| − | |||
| − | |||
| − | |||
| − | |||
| − | |||
| − | |||
| − | |||
| − | |||
| − | |||
| − | |||
| − | |||
| − | |||
| − | |||
| − | |||
| − | |||
| − | + | == Adding Materials or Activities == | |
| − | === | + | To add content, click ''Edit mode'' on in the top right corner (3). Various options will then become available in the main course area. |
| + | ===Adding Content=== | ||
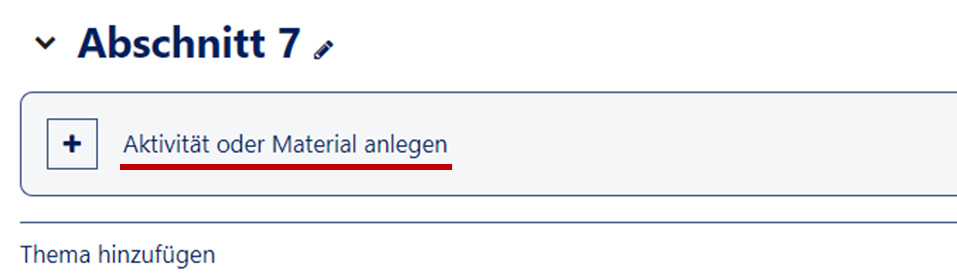
| + | To add content, select a topic section and click the "+" symbol, then choose ''Activity or Material''. A selection window will open showing different types of content. | ||
| + | [[Datei:Material anlegen.png|alternativtext=|mini|491x491px|Aktivität / Material anlegen|ohne]] | ||
| + | The selection is divided into Activities and Resources. Clicking on an item will add it to the course and allow immediate configuration. | ||
| + | You can find an overview of instructions for course activities here: [[Kursaktivitäten|Course Activities]]. | ||
| − | + | You can also organize content into subsections. Subsections can be added via the "+" icon as well. | |
| − | |||
| − | |||
| − | + | ===Activity Settings on the Course Page=== | |
| + | Each item has a '''menu''' (Edit mode): | ||
| − | : ''' | + | * '''Edit settings''': Change the complete configuration. |
| + | * '''Move''': Move a section. | ||
| + | * '''Hide''': Make the item invisible to participants. | ||
| + | * '''Duplicate''': Create a copy of the item (marked with “(copy)”). | ||
| + | * '''Assign roles''': Change access rights (e.g. allow uploads). | ||
| + | * '''Delete''': Remove the item (no recycle bin – this cannot be undone). | ||
| + | '''Move''': Materials can also be moved via drag and drop. When hovering over an item, a cross symbol will appear for repositioning. | ||
| + | '''Bulk actions''': The Bulk actions feature allows you to select multiple items or entire sections for deletion, repositioning, duplication, or visibility adjustments. | ||
| − | + | === Example: Adding a File === | |
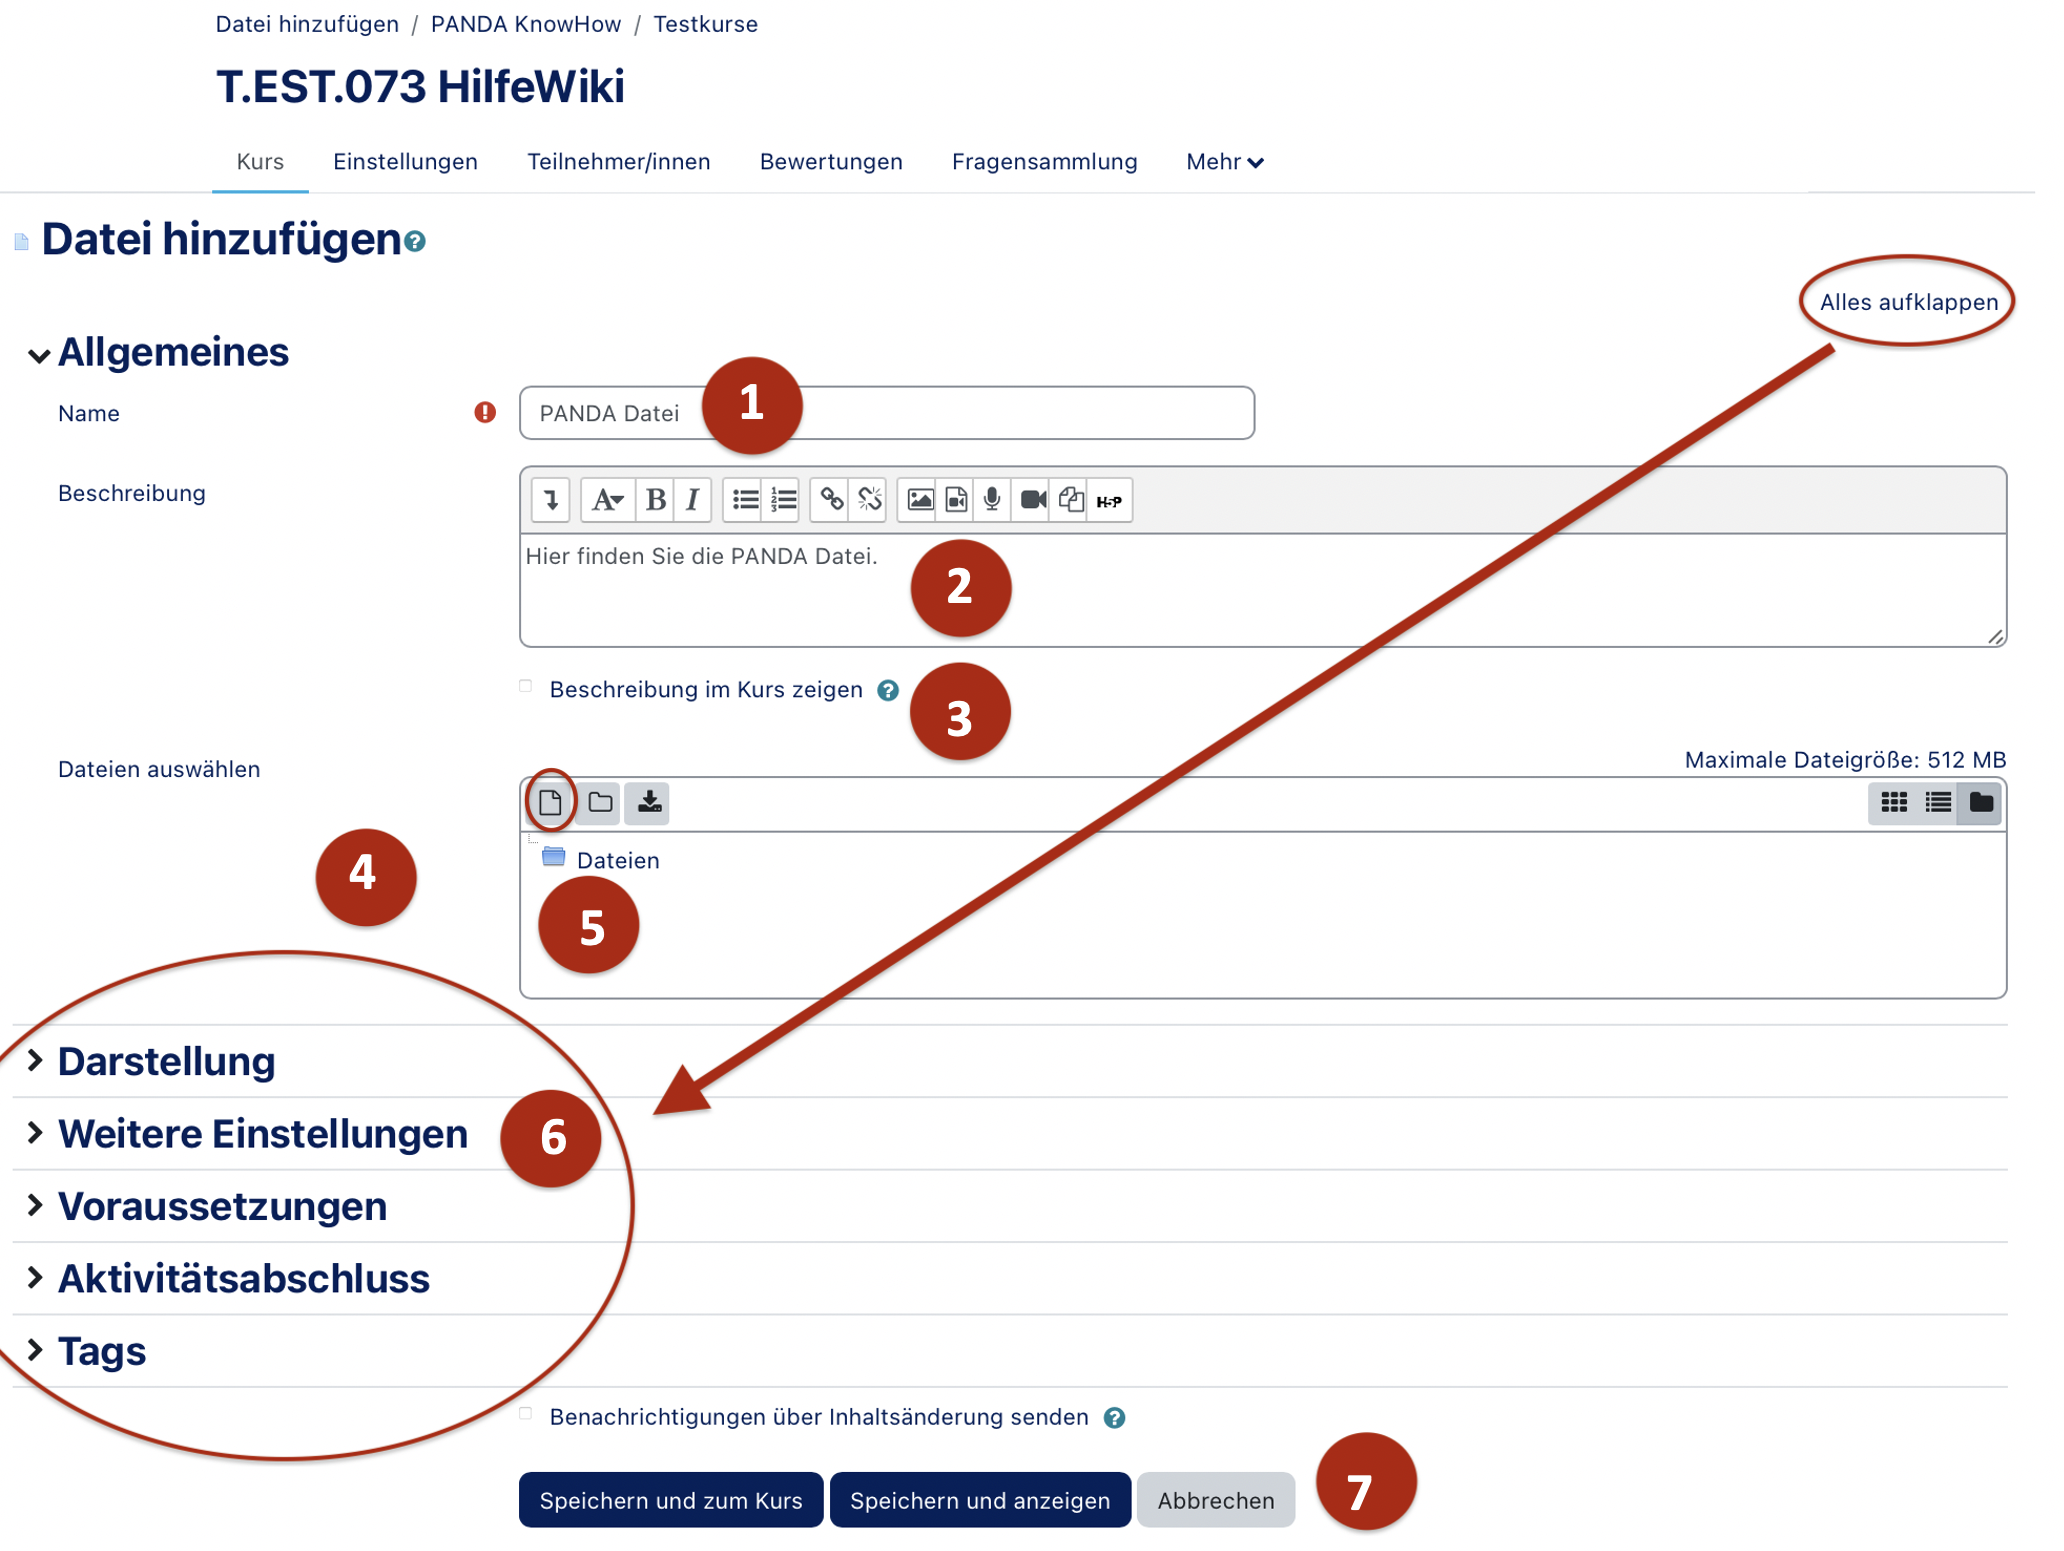
| − | + | After selecting File, a settings window will open: | |
| + | Name (1): Title displayed in the course (does not have to match the file name). | ||
| + | Description (2): Optional. Can be displayed if desired. | ||
| + | Select files (3): Upload a file using the file picker. | ||
| + | Additional settings (4): e.g. display format, visibility settings. | ||
| + | [[Datei:Datei hinzufügen.png|miniatur|519x519px|Datei hinzufügen: Grundeinstellungen|alternativtext=|ohne]] | ||
| − | + | ==== File Upload ==== | |
| + | Click the upload field to open the PANDA file picker. Here, you can: | ||
| − | + | * Select a file from your device (1), | |
| − | + | * Be automatically listed as the author (2), | |
| + | * Choose a license (e.g. Creative Commons or custom rights), | ||
| + | * Upload the file (4). | ||
| − | + | '''Alternatively''': Drag and drop a file directly into the course page. However, metadata such as author or license cannot be set this way.<br clear="all"> | |
| − | + | [[Datei:Datei hochladen.png|miniatur|600x600px|Datei auswählen und hochladen|alternativtext=|ohne]] | |
| − | |||
| − | |||
| − | |||
| − | |||
| − | |||
| − | |||
| − | |||
| − | |||
| − | |||
| − | |||
| − | |||
| − | |||
| − | |||
==== Configuration options ==== | ==== Configuration options ==== | ||
| − | + | # '''Appearance''': e.g. preview, download, show file type. | |
| − | + | # '''Common module settings''': visibility, PANDA internal ID (optional, used e.g. for grading). | |
| − | : | + | # '''Restrict access''': Visibility rules based on date, group membership, or test results. |
| − | + | # '''Completion conditions''': Set completion rules and deadlines. | |
| − | + | # '''Tags''': Keywords to improve searchability. | |
| − | |||
| − | |||
| − | |||
| − | |||
| − | |||
| − | |||
| − | |||
| − | |||
| − | |||
| − | |||
| − | : | ||
| − | |||
| − | |||
| − | |||
| − | |||
| − | |||
| − | |||
| − | |||
| − | : | ||
| − | |||
| − | |||
| − | |||
| − | |||
| − | <br clear=all> | + | [[Datei:Datei weitere Einstellungen.png|miniatur|600x600px|Weitere Einstellungsmöglichkeiten|alternativtext=|ohne]]<br clear=all>To set a condition, click '''Add restriction''', to open a context menu. [[Datei:Datei Voraussetzungen.png|miniatur|592x592px|alternativtext=|ohne]] |
| − | + | * Under Date, you can set when an item becomes visible or hidden (e.g. from May 15 onward). | |
| − | + | * Under Grade, you can require prior achievements (e.g. pass a quiz with at least 80% or submit an assignment) for the item to be shown. | |
| − | <br clear=all> | + | * Under Group, access can be limited to members of a specific group. |
| + | * Under User profile, access can be restricted to specific users (e.g. via email address). | ||
| + | * Under Restriction set, multiple conditions can be combined.<br clear="all"> | ||
Aktuelle Version vom 30. Juli 2025, 12:00 Uhr
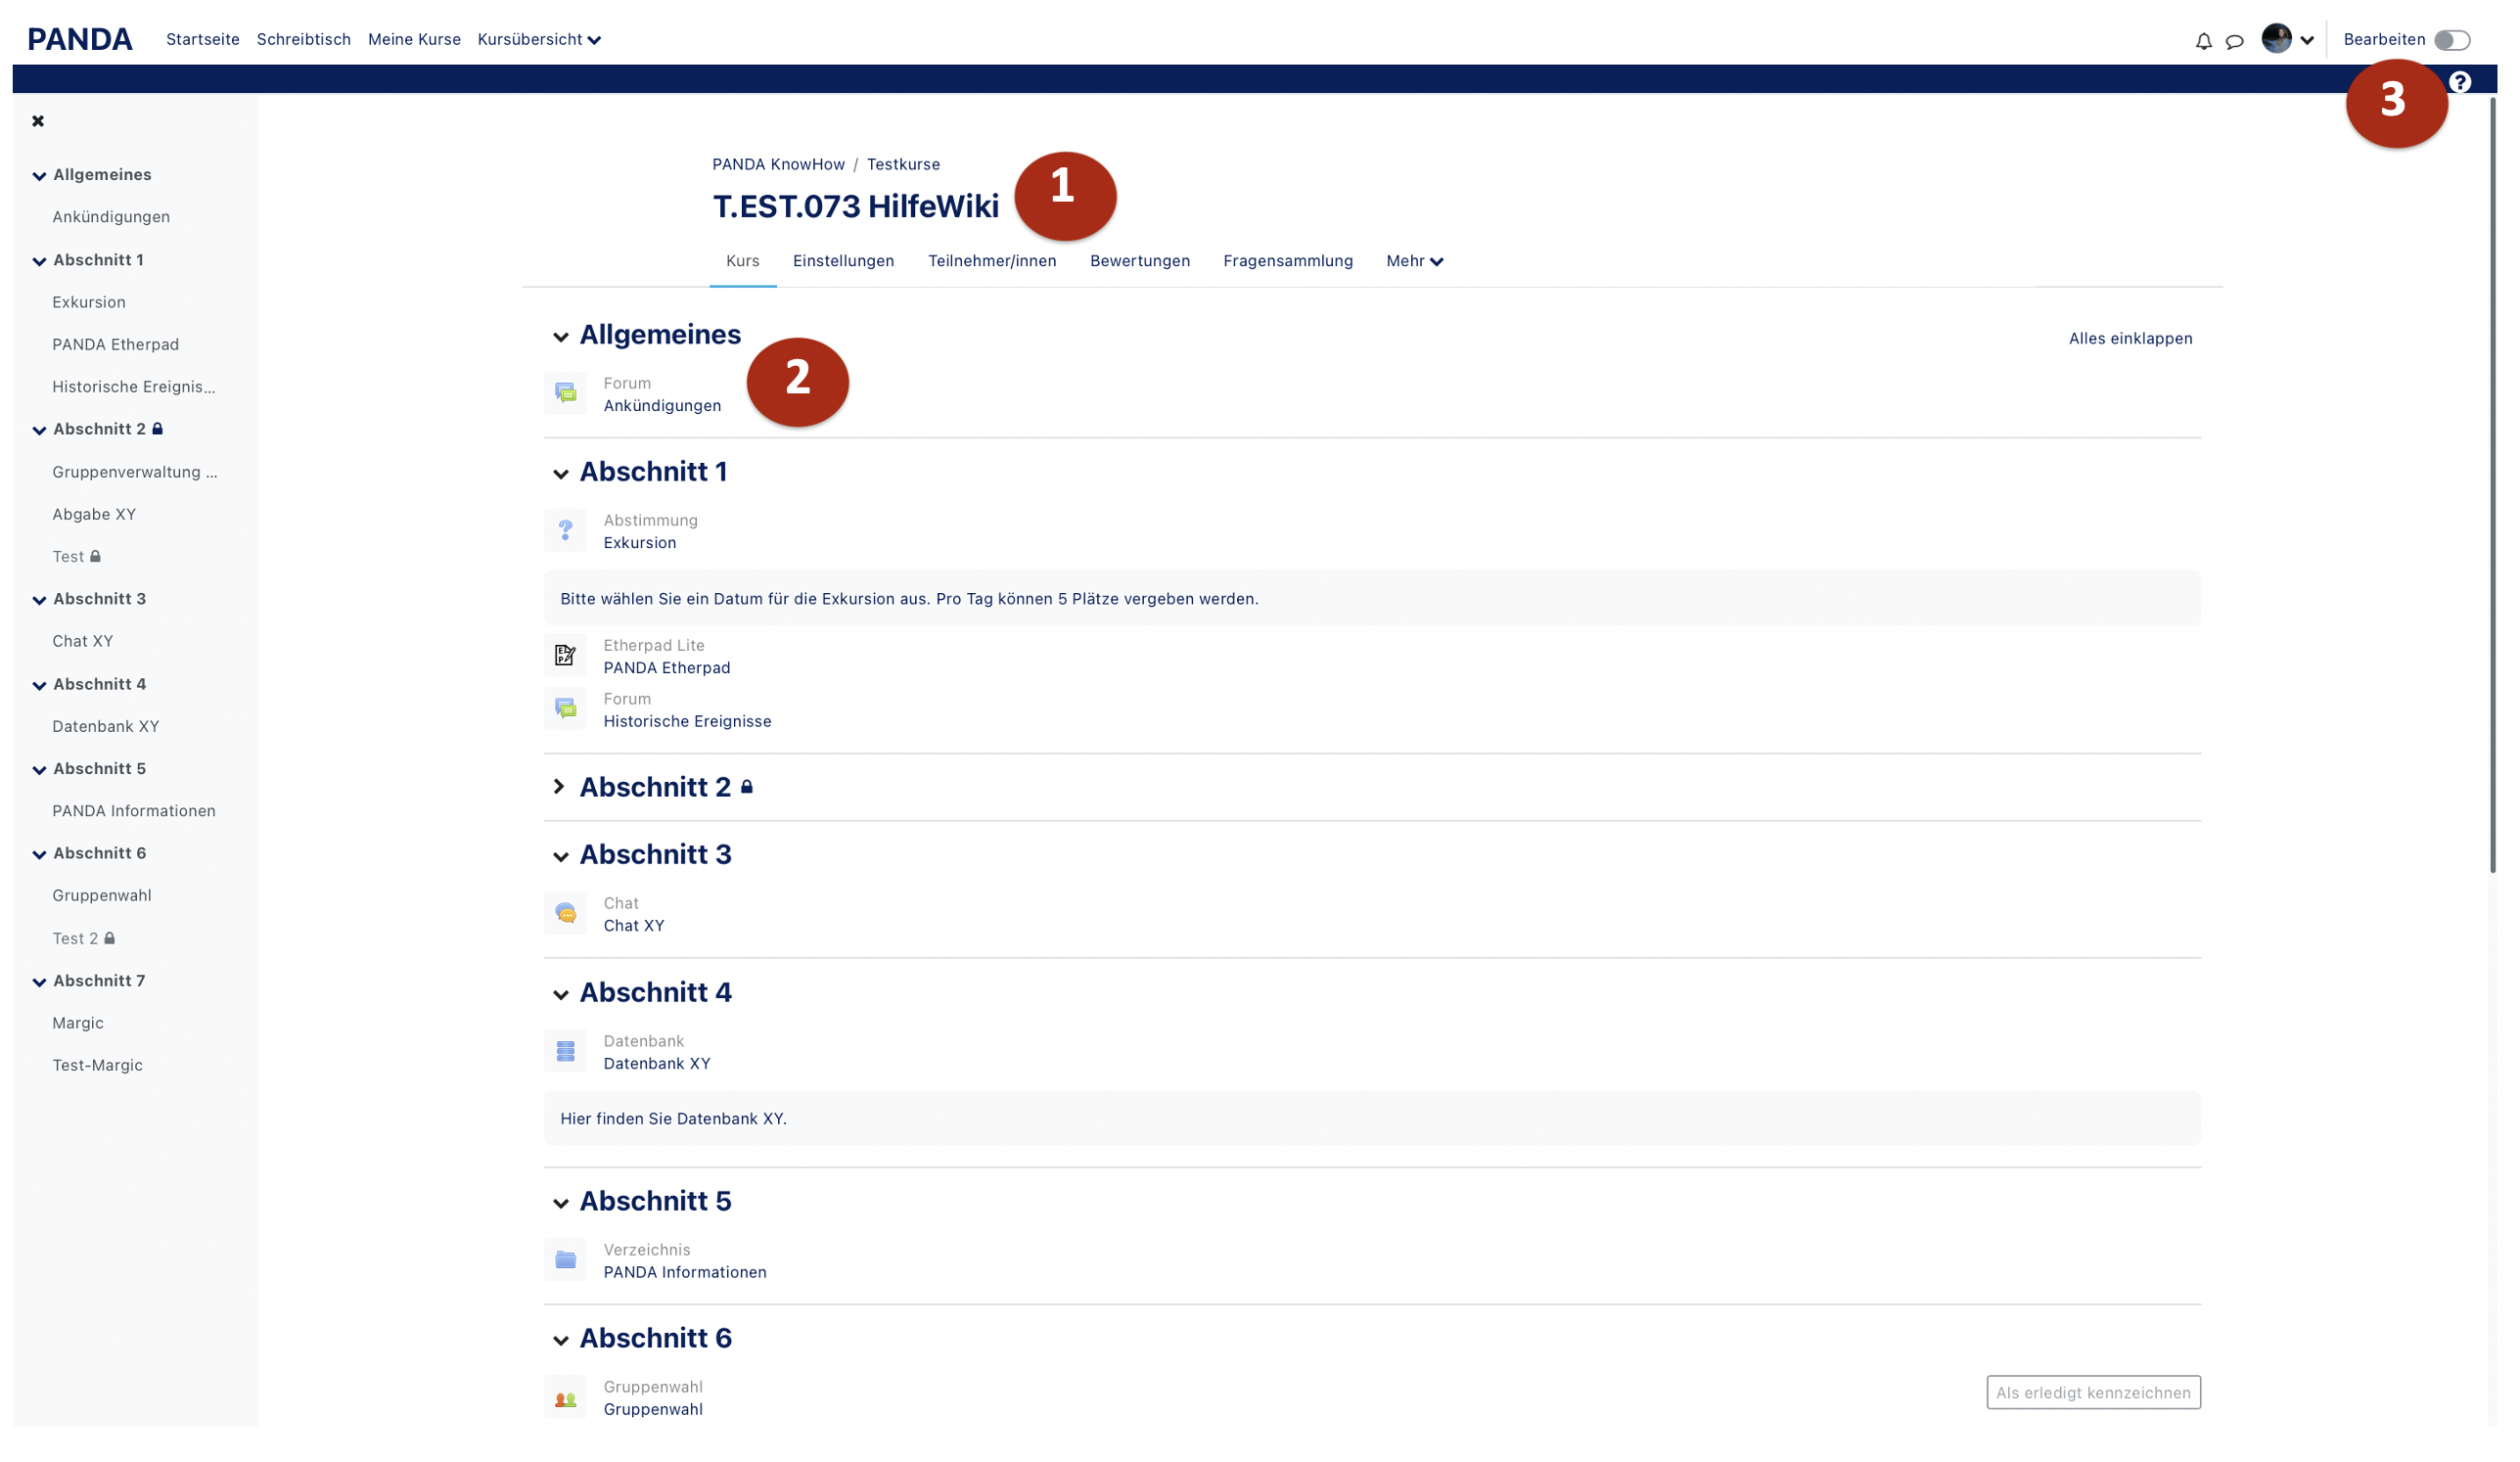
In a newly created PANDA course, the central section (1) – the main course area – contains a set number of empty topics and an Announcements Forum (2). By enabling the Edit mode function (3), you can add and adjust content in this section.

Announcements Forum[Bearbeiten | Quelltext bearbeiten]
The Announcements Forum (2) is automatically generated in every course. Only users with course management rights (e.g. teachers or tutors) can post messages here. Each course can only have one Announcements Forum. It is useful for sharing information about specific sessions, for example.
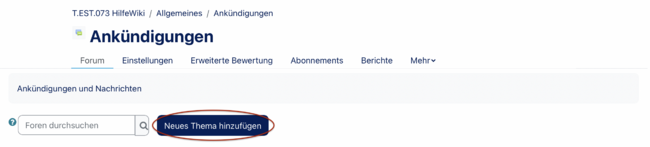
In the Announcements block, the most recent posts are displayed. By default, all course participants are automatically subscribed to this forum.
Adding Materials or Activities[Bearbeiten | Quelltext bearbeiten]
To add content, click Edit mode on in the top right corner (3). Various options will then become available in the main course area.
Adding Content[Bearbeiten | Quelltext bearbeiten]
To add content, select a topic section and click the "+" symbol, then choose Activity or Material. A selection window will open showing different types of content.
The selection is divided into Activities and Resources. Clicking on an item will add it to the course and allow immediate configuration. You can find an overview of instructions for course activities here: Course Activities.
You can also organize content into subsections. Subsections can be added via the "+" icon as well.
Activity Settings on the Course Page[Bearbeiten | Quelltext bearbeiten]
Each item has a menu (Edit mode):
- Edit settings: Change the complete configuration.
- Move: Move a section.
- Hide: Make the item invisible to participants.
- Duplicate: Create a copy of the item (marked with “(copy)”).
- Assign roles: Change access rights (e.g. allow uploads).
- Delete: Remove the item (no recycle bin – this cannot be undone).
Move: Materials can also be moved via drag and drop. When hovering over an item, a cross symbol will appear for repositioning. Bulk actions: The Bulk actions feature allows you to select multiple items or entire sections for deletion, repositioning, duplication, or visibility adjustments.
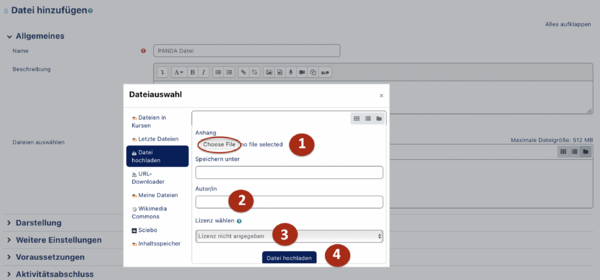
Example: Adding a File[Bearbeiten | Quelltext bearbeiten]
After selecting File, a settings window will open: Name (1): Title displayed in the course (does not have to match the file name). Description (2): Optional. Can be displayed if desired. Select files (3): Upload a file using the file picker. Additional settings (4): e.g. display format, visibility settings.
File Upload[Bearbeiten | Quelltext bearbeiten]
Click the upload field to open the PANDA file picker. Here, you can:
- Select a file from your device (1),
- Be automatically listed as the author (2),
- Choose a license (e.g. Creative Commons or custom rights),
- Upload the file (4).
Alternatively: Drag and drop a file directly into the course page. However, metadata such as author or license cannot be set this way.
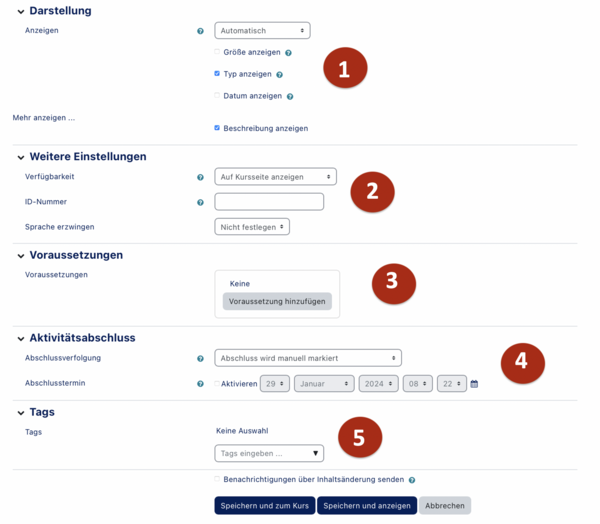
Configuration options[Bearbeiten | Quelltext bearbeiten]
- Appearance: e.g. preview, download, show file type.
- Common module settings: visibility, PANDA internal ID (optional, used e.g. for grading).
- Restrict access: Visibility rules based on date, group membership, or test results.
- Completion conditions: Set completion rules and deadlines.
- Tags: Keywords to improve searchability.
To set a condition, click Add restriction, to open a context menu.

- Under Date, you can set when an item becomes visible or hidden (e.g. from May 15 onward).
- Under Grade, you can require prior achievements (e.g. pass a quiz with at least 80% or submit an assignment) for the item to be shown.
- Under Group, access can be limited to members of a specific group.
- Under User profile, access can be restricted to specific users (e.g. via email address).
- Under Restriction set, multiple conditions can be combined.


