(Die Seite wurde komplett ins Englische übersetzt) |
|||
| Zeile 11: | Zeile 11: | ||
* Download the configuration file: | * Download the configuration file: | ||
<iframe key="infoboard" width="600" height="320" path="vpn-config/index.php?group=uni&os=lin" /> | <iframe key="infoboard" width="600" height="320" path="vpn-config/index.php?group=uni&os=lin" /> | ||
| − | * | + | * Import the configuration file '''"OpenVPN-UPB-NG_*.ovpn"''' and the user certificate into the network manager. |
| − | * | + | * Connect to the university via OpenVPN. |
| − | * VPN | + | * Configuring VPN on Linux |
== Step-by-step instructions == | == Step-by-step instructions == | ||
=== Create network certificate === | === Create network certificate === | ||
| − | + | To use OpenVPN, you must first install a [https://hilfe.uni-paderborn.de/Netzwerkzertifikate personal network] certificate. | |
| − | + | If you use the WLAN "eduroam", the certificate is already installed on your computer. | |
=== Configuring VPN on Linux === | === Configuring VPN on Linux === | ||
| − | + | Download the configuration file, select the VPN you want to connect to and click on Download. | |
| − | |||
| − | |||
| − | + | Normally "Uni-VPN (Standard)" should be the right choice, but if you have problems with the connection, try "Uni-VPN-TCP" again.<iframe key="infoboard" width="600" height="320" path="vpn-config/index.php?group=uni&os=lin" /> | |
| − | + | At least version '''OpenVPN 2.4''' is required. | |
| − | |||
| − | + | == Connection via the network manager of Ubuntu == | |
| + | There is also the possibility to set up the connection via the network manager of Ubuntu. | ||
| + | To use the network manager, the previously created network certificate must be unpacked: | ||
: <code>$ openssl pkcs12 -in Network_Certificate.p12 -out Network_Certificate_OPVPN.crt.pem -clcerts -nokeys </code> | : <code>$ openssl pkcs12 -in Network_Certificate.p12 -out Network_Certificate_OPVPN.crt.pem -clcerts -nokeys </code> | ||
: <code>$ openssl pkcs12 -in Network_Certificate.p12 -out Network_Certificate_OPVPN.key.pem -nocerts -nodes </code> | : <code>$ openssl pkcs12 -in Network_Certificate.p12 -out Network_Certificate_OPVPN.key.pem -nocerts -nodes </code> | ||
| − | + | The two new files are copied to a secure location in the user directory with the network certificate. | |
| − | + | To do this, the necessary packages must first be installed via terminal: | |
: <code># sudo apt-get install openvpn network-manager-openvpn network-manager-openvpn-gnome</code> | : <code># sudo apt-get install openvpn network-manager-openvpn network-manager-openvpn-gnome</code> | ||
| − | + | With the help of the Network Managers (network connections) a new VPN connection can be create. To do this, click on "Add". | |
| − | |||
[[Datei:VPN_Unter_Linux_01.png]] | [[Datei:VPN_Unter_Linux_01.png]] | ||
| Zeile 53: | Zeile 51: | ||
<br><br> | <br><br> | ||
| − | + | In the next window the connection type OpenVPN must be selected. | |
<br clear=all> | <br clear=all> | ||
[[Datei:Zertikate einstellen.png|links|300px]] | [[Datei:Zertikate einstellen.png|links|300px]] | ||
| − | + | Afterwards the just unpacked certificates must be selected. The CA certificate field should be filled automatically. | |
| − | + | If the CA certificate field is not filled in automatically, the configuration file '''"openvpn-upb-ng-lin.ovpn"''' should be renamed to '''"openvpn-upb-ng-lin.pem"''' and additionally placed in the folder with the certificates. Then you can select the file as a CA certificate. | |
<br clear=all> | <br clear=all> | ||
| Zeile 67: | Zeile 65: | ||
[[Datei:VPN_Unter_Linux_05.png|links|400px|mini|Abgeschlossene Einrichtung]] <br><br> | [[Datei:VPN_Unter_Linux_05.png|links|400px|mini|Abgeschlossene Einrichtung]] <br><br> | ||
| − | + | After saving, the VPN connection can be activated via the upper system bar. | |
<br clear=all> | <br clear=all> | ||
Version vom 20. März 2020, 16:30 Uhr
VPN (Virtual Private Network) is needed if you want to use your computer from outside the university to access services that are only accessible within the university network. VPN guarantees secure access to the university network from other networks (dial-up via other providers, external company or university networks).
What needs to be done?[Bearbeiten | Quelltext bearbeiten]
- To use OpenVPN, you must first download a etwork certificate.
- Use your package manager to install OpenVPN version >2.4 and the OpenVPN support for the network manager.
- Download the configuration file:
- Import the configuration file "OpenVPN-UPB-NG_*.ovpn" and the user certificate into the network manager.
- Connect to the university via OpenVPN.
- Configuring VPN on Linux
Step-by-step instructions[Bearbeiten | Quelltext bearbeiten]
Create network certificate[Bearbeiten | Quelltext bearbeiten]
To use OpenVPN, you must first install a personal network certificate.
If you use the WLAN "eduroam", the certificate is already installed on your computer.
Configuring VPN on Linux[Bearbeiten | Quelltext bearbeiten]
Download the configuration file, select the VPN you want to connect to and click on Download.
Normally "Uni-VPN (Standard)" should be the right choice, but if you have problems with the connection, try "Uni-VPN-TCP" again.
At least version OpenVPN 2.4 is required.
Connection via the network manager of Ubuntu[Bearbeiten | Quelltext bearbeiten]
There is also the possibility to set up the connection via the network manager of Ubuntu.
To use the network manager, the previously created network certificate must be unpacked:
$ openssl pkcs12 -in Network_Certificate.p12 -out Network_Certificate_OPVPN.crt.pem -clcerts -nokeys$ openssl pkcs12 -in Network_Certificate.p12 -out Network_Certificate_OPVPN.key.pem -nocerts -nodes
The two new files are copied to a secure location in the user directory with the network certificate.
To do this, the necessary packages must first be installed via terminal:
# sudo apt-get install openvpn network-manager-openvpn network-manager-openvpn-gnome
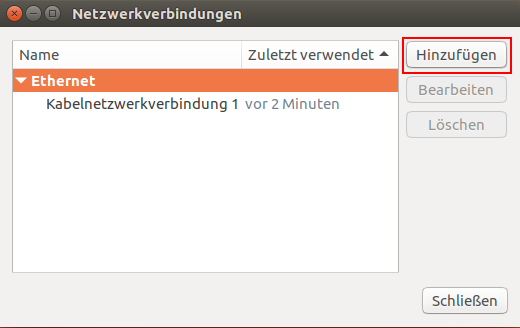
With the help of the Network Managers (network connections) a new VPN connection can be create. To do this, click on "Add".
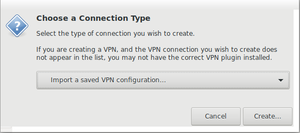
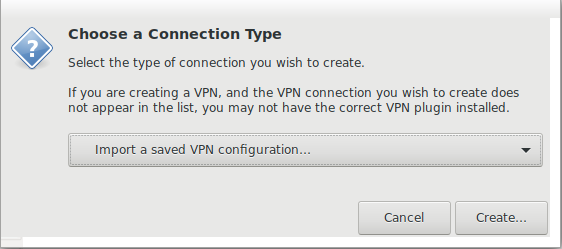
In the next window the connection type OpenVPN must be selected.
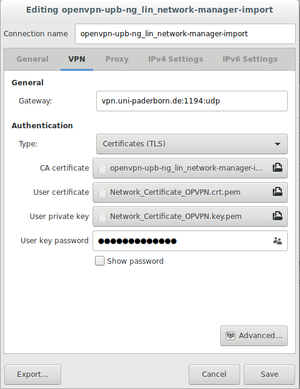
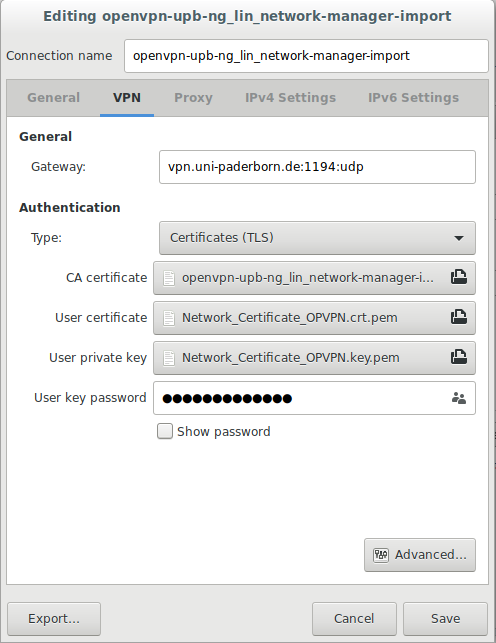
Afterwards the just unpacked certificates must be selected. The CA certificate field should be filled automatically.
If the CA certificate field is not filled in automatically, the configuration file "openvpn-upb-ng-lin.ovpn" should be renamed to "openvpn-upb-ng-lin.pem" and additionally placed in the folder with the certificates. Then you can select the file as a CA certificate.
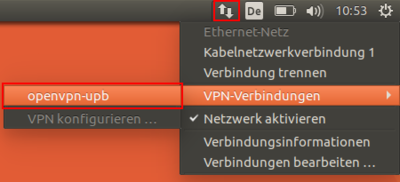
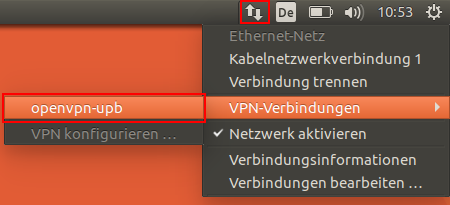
After saving, the VPN connection can be activated via the upper system bar.
