| Zeile 21: | Zeile 21: | ||
<br> | <br> | ||
<span style="color:green"> Do you work from outside the university? Are you on the way?</span> | <span style="color:green"> Do you work from outside the university? Are you on the way?</span> | ||
| − | * First connect to the [[VPN | + | * First connect to the [[VPN unter macOS | program Tunnelblick]] with the university's VPN network |
<br clear=all> | <br clear=all> | ||
Are you on the university campus? You can connect to the university network in the following ways: | Are you on the university campus? You can connect to the university network in the following ways: | ||
| − | * Via LAN cable to the [[ | + | * Via LAN cable to the [[Netzwerkzugang per LAN-Dose für Mitarbeiter | Network sockets]] |
| − | * Via the WLAN network [[Eduroam | + | * Via the WLAN network [[Eduroam unter MacOS | Eduroam]] |
| − | * Via the WLAN network [[ | + | * Via the WLAN network [[Webauth einrichten | Webauth]] |
=== Connect to the server === | === Connect to the server === | ||
| − | [[Datei:Screenshot MacOS | + | [[Datei:Screenshot MacOS Netzlaufwerk10.png]] Open Finder. |
<br> | <br> | ||
| − | [[ | + | [[Datei:Netzlaufwerk einbinden 1.png|links|mini|ohne|380px|Finder: Go to...]] |
<br> | <br> | ||
<br> | <br> | ||
| − | * Click '''"Go"''' in the top menu bar. | + | * Click '''"Go to"''' in the top menu bar. |
* Then select '''"Connect to server..."'''. | * Then select '''"Connect to server..."'''. | ||
<br> | <br> | ||
| Zeile 44: | Zeile 44: | ||
<br> | <br> | ||
| − | <div class="tleft" style="clear:none">[[ | + | <div class="tleft" style="clear:none">[[Date:Screenshot MacOS Netzlaufwerk11.png|links|mini|ohne|530px|You can use this window to connect to a network drive]]</div> |
<br clear=all> | <br clear=all> | ||
| Zeile 57: | Zeile 57: | ||
'''Attention!''' If you specify a different username, you will only have access to that user's shared files and folders and will not be granted write permissions. | '''Attention!''' If you specify a different username, you will only have access to that user's shared files and folders and will not be granted write permissions. | ||
| − | [[ | + | [[Datei:Netzlaufwerk einbinden 3.png|links|mini|483x483px]] |
<br> | <br> | ||
* Then confirm by clicking on the ''''Connect''' button. | * Then confirm by clicking on the ''''Connect''' button. | ||
| Zeile 63: | Zeile 63: | ||
<br clear=all> | <br clear=all> | ||
| − | [[ | + | [[Datei:Netzlaufwerk einbinden 4.png|links|mini|431x431px]] |
<br> | <br> | ||
* You will now be asked to confirm the connection to the server. To do this, click on '''Connect'''. | * You will now be asked to confirm the connection to the server. To do this, click on '''Connect'''. | ||
| Zeile 69: | Zeile 69: | ||
To log in, select the following settings: | To log in, select the following settings: | ||
| − | [[ | + | [[Datei:Netzlaufwerk einbinden 5.png|links|mini|450px]] |
<br> | <br> | ||
* '''Connect as:''' Registered user | * '''Connect as:''' Registered user | ||
| Zeile 82: | Zeile 82: | ||
<bootstrap_panel heading="Include group directory" color="info"> | <bootstrap_panel heading="Include group directory" color="info"> | ||
| − | [[ | + | [[Datei:Gruppenverzeichnis einbinden.png|links|mini|483x483px]] |
<br> | <br> | ||
* If you would like to include a group directory, enter the following under "Server address", where * must be replaced by the group name: | * If you would like to include a group directory, enter the following under "Server address", where * must be replaced by the group name: | ||
| Zeile 90: | Zeile 90: | ||
<br clear=all> | <br clear=all> | ||
| − | [[ | + | [[Datei: Netzlaufwerk einbinden 5.png|links|mini|431x431px]] |
<br> | <br> | ||
* Select '''"Registered User"''' | * Select '''"Registered User"''' | ||
| Zeile 142: | Zeile 142: | ||
In the first step, we create a shortcut to the network drive on the desktop. In this example, we create a shortcut to the personal home directory. You can create any other group directory shortcuts in the same way. | In the first step, we create a shortcut to the network drive on the desktop. In this example, we create a shortcut to the personal home directory. You can create any other group directory shortcuts in the same way. | ||
| − | [[ | + | [[Datei:Screenshot MacOS Netzlaufwerke08.png|links|mini|ohne|450px|create alias]] |
<br> | <br> | ||
* In Finder, open the directory you want to create a shortcut for. | * In Finder, open the directory you want to create a shortcut for. | ||
| Zeile 152: | Zeile 152: | ||
<br clear=all> | <br clear=all> | ||
| − | [[ | + | [[Datei:Screenshot MacOS Netzlaufwerk14.png|links|mini|ohne|350px|rename alias]] |
<br> | <br> | ||
* We can rename the alias as we want. | * We can rename the alias as we want. | ||
| Zeile 161: | Zeile 161: | ||
Now let's set our shortcut to load when the computer starts. Depending on your macOS version, you can find the settings for the login item as follows: | Now let's set our shortcut to load when the computer starts. Depending on your macOS version, you can find the settings for the login item as follows: | ||
| − | [[ | + | [[Datei:Screenshot MacOS Netzlaufwerk12.png]] Open '''System Preferences'''. |
<br clear=all> | <br clear=all> | ||
| Zeile 168: | Zeile 168: | ||
[[File:Screenshot MacOS network drive13.png|left|mini|without|450px|System Settings - Users & Groups]] | [[File:Screenshot MacOS network drive13.png|left|mini|without|450px|System Settings - Users & Groups]] | ||
<br> | <br> | ||
| − | * Select ''' | + | * Select '''"Users & Groups"'''. |
<br clear=all> | <br clear=all> | ||
| − | [[ | + | [[Datei:Screenshot MacOS Netzlaufwerk07.png|l|miinksni|ohne|450px|login items]] |
<br> | <br> | ||
# Select your user account on the left side. | # Select your user account on the left side. | ||
| − | # Select the '''Login Items''' tab. | + | # Select the '''"Login Items"''' tab. |
# We can add a new login object using the <code>+</code>. | # We can add a new login object using the <code>+</code>. | ||
<br clear=all> | <br clear=all> | ||
| Zeile 180: | Zeile 180: | ||
</bootstrap_panel> | </bootstrap_panel> | ||
<bootstrap_panel heading="macOS 13 Ventura and newer" color="info"> | <bootstrap_panel heading="macOS 13 Ventura and newer" color="info"> | ||
| − | [[ | + | [[Datei:Screenshot MacOS Netzlaufwerk16.png|links|mini|ohne|450px|General settings]] |
<br> | <br> | ||
| − | * Click ''"General"''. | + | * Click '''"General"'''. |
| − | * Click ''"Login Items"''. | + | * Click '''"Login Items"'''. |
<br clear=all> | <br clear=all> | ||
| − | [[ | + | [[Datei:Screenshot MacOS Netzlaufwerk17.png|links|mini|ohne|450px|Add login items]] |
<br> | <br> | ||
* Click on the <code>+</code> to add a new login item. | * Click on the <code>+</code> to add a new login item. | ||
| Zeile 194: | Zeile 194: | ||
</bootstrap_accordion> | </bootstrap_accordion> | ||
| − | [[ | + | [[Datei:Screenshot MacOS Netzlaufwerk15.png|links|mini|ohne|450px|Add login object]] |
<br> | <br> | ||
| − | # Open '''Desk'''. | + | # Open '''"Desk"'''. |
# Select the shortcut we just created. | # Select the shortcut we just created. | ||
| − | # Click ''"Add"''. | + | # Click '''"Add"'''. |
<br clear=all> | <br clear=all> | ||
| − | [[ | + | [[Datei:Screenshot MacOS Netzlaufwerk09.png|links|mini|ohne|450px|Overview of login objects]] |
<br> | <br> | ||
* We have now created a login object for the personal home directory. | * We have now created a login object for the personal home directory. | ||
| Zeile 213: | Zeile 213: | ||
==See also== | ==See also== | ||
| − | * [[ | + | * [[Netzwerkspeicher]] |
| − | * [[ | + | * [[Netzwerk]] |
Version vom 28. August 2024, 12:59 Uhr
On macOS you can access your personal network storage and group drives without additional programs. This guide explains how to integrate them.
Requirements[Bearbeiten | Quelltext bearbeiten]
- Home directory: If you want to use your personal network storage, it must be activated once via the service portal.
- Group Storage: The permission for the group storage. This is assigned by your area.
What needs to be done?[Bearbeiten | Quelltext bearbeiten]
- Connect to the University of Paderborn network
- Mount personal network storage as a network drive
- Mount group network storage as network drives if you have appropriate permissions
Step-by-step instructions[Bearbeiten | Quelltext bearbeiten]
Connect to the university network[Bearbeiten | Quelltext bearbeiten]
To mount a network drive in macOS, you must first ensure that your computer has a connection to the university network.
Do you work from outside the university? Are you on the way?
- First connect to the program Tunnelblick with the university's VPN network
Are you on the university campus? You can connect to the university network in the following ways:
- Via LAN cable to the Network sockets
- Via the WLAN network Eduroam
- Via the WLAN network Webauth
Connect to the server[Bearbeiten | Quelltext bearbeiten]
 Open Finder.
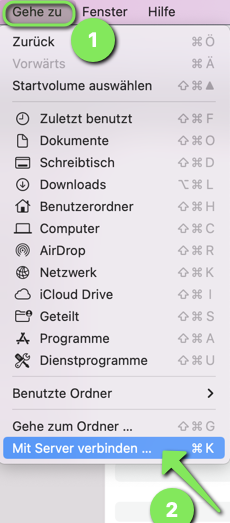
- Click "Go to" in the top menu bar.
- Then select "Connect to server...".
Include user directory
If you now want to integrate your personal or another user directory, enter the following in the “Server address” line:
smb://fs-cifs.uni-paderborn.de/upb/users/*/**
Replace * with the first letter of the username and ** with the username.
Attention! If you specify a different username, you will only have access to that user's shared files and folders and will not be granted write permissions.
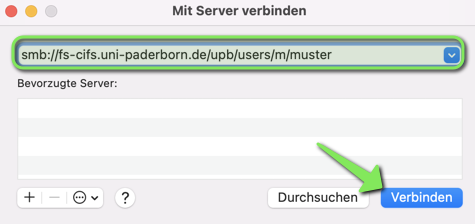
- Then confirm by clicking on the 'Connect button.
- You can add the connection to the list of preferred servers using the
+in the bottom left corner.
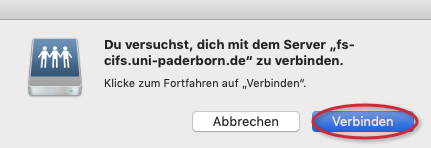
- You will now be asked to confirm the connection to the server. To do this, click on Connect.
To log in, select the following settings:
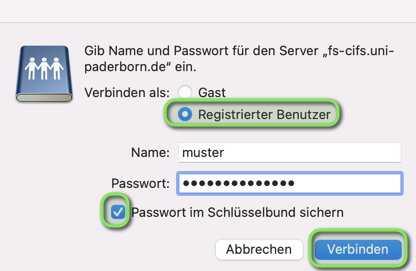
- Connect as: Registered user
- Name: username (Replace "username" with your university account)
- Password: Password for the university account
- Check the checkbox for 'Secure password in keychain if you do not want to re-enter your password every time you connect to the network storage.
- Then click "Connect".
- Does logging in with "username" not work? Use "username@AD" instead
Include group directory

- If you would like to include a group directory, enter the following under "Server address", where * must be replaced by the group name:
smb://fs-cifs.uni-paderborn.de/upb/groups/*
- Then confirm with 'Connect.
- You can add the connection to the list of preferred servers using the
+in the bottom left corner.
- Select "Registered User"
- Enter username and password for your university account.
- Check the box for 'Secure password in key ring.
- Finally, click Connect.
- Does logging in with "username" not work? Use "username@AD" instead
Include main directory
As an alternative to integrating individual group directories, you can also connect to the main directory by default. From there you can access all group directories for which you have permission.
To do this, include the following directory:
smb://fs-cifs.uni-paderborn.de/upb/groups
Include scratch area
Department Scratch Area
smb://fs-cifs.uni-paderborn.de/upb/scratch/departments/*
Replace * with the short name of your department scratch
Group Scratch Area
smb://fs-cifs.uni-paderborn.de/upb/scratch/groups/*
Replace * with the short name of your group scratch.
Personal Scratch Area
smb://fs-cifs.uni-paderborn.de/upb/scratch/users/*/**
Replace * with the first letter of your username. Replace ** with your username from your university account.
Show network drive[Bearbeiten | Quelltext bearbeiten]
A drive icon with your username or group name should now appear on your desktop. If that's not the case, click on the "Finder" menu item in the Finder and select "Settings". In the window that opens, you need to activate the "Connected servers" option.
Connect automatically[Bearbeiten | Quelltext bearbeiten]
You can configure your network drive so that it is automatically connected when you turn on the computer. To do this, the network drive must be added to the login objects.
Create shortcut[Bearbeiten | Quelltext bearbeiten]
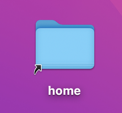
In the first step, we create a shortcut to the network drive on the desktop. In this example, we create a shortcut to the personal home directory. You can create any other group directory shortcuts in the same way.
- In Finder, open the directory you want to create a shortcut for.
- In this example we take the Data folder from the home directory.
- Press and hold the
optionandcommandkeys on your keyboard. - Now drag the folder from Finder to the desktop.
- We can see that we have created a link by the small arrow in the bottom left corner of the folder.
- macOS calls this Alias.
- We can rename the alias as we want.
- This will now open our Data folder in the home directory.
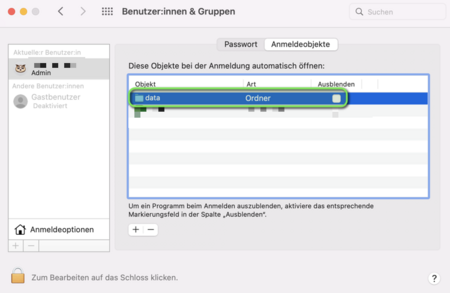
Add Login Item[Bearbeiten | Quelltext bearbeiten]
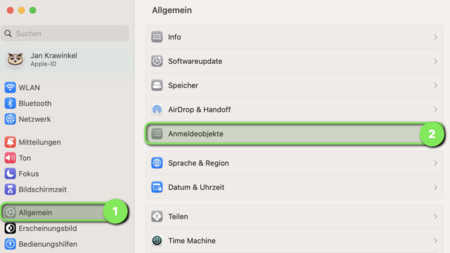
Now let's set our shortcut to load when the computer starts. Depending on your macOS version, you can find the settings for the login item as follows:
 Open System Preferences.
macOS 12 Monterey and older
- Select "Users & Groups".

- Select your user account on the left side.
- Select the "Login Items" tab.
- We can add a new login object using the
+.
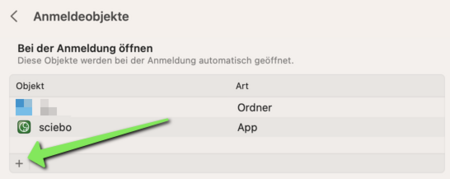

- Open "Desk".
- Select the shortcut we just created.
- Click "Add".
- We have now created a login object for the personal home directory.
- We can also create login objects for group directories in the same way.
Notes:
- Your password for the university account must be saved in the keychain so that registration works automatically. We have set this up like this above.
- You must be on the University of Paderborn network or use VPN to access the network drive.
- If you are away from the university, an error message may occur if the network drive is connected before the VPN connection is established.


