Exchange einrichten in Thunderbird (Windows)/en
(Die Seite wurde neu angelegt: „{{translated page |origin=Exchange einrichten in Thunderbird (Windows) |lang=en |translated title=Set up Exchange in Thunderbird (Windows) }} Short Introductio…“) |
|||
| Zeile 4: | Zeile 4: | ||
|translated title=Set up Exchange in Thunderbird (Windows) | |translated title=Set up Exchange in Thunderbird (Windows) | ||
}} | }} | ||
| − | + | {{ambox | |
| + | |type=content | ||
| + | |text=For Exchange accounts, we recommend using Microsoft Outlook. | ||
| + | <br> | ||
| + | If you use Mozilla Thunderbird, not all functions may be available to you. | ||
| + | }} | ||
| + | == Install Thunderbird == | ||
| + | Install Thunderbird. You can find the installation files here: | ||
| + | * https://www.thunderbird.net/en/ | ||
| − | == | + | ==Set up an email mailbox== |
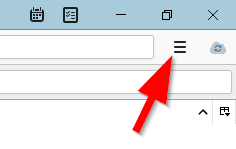
| − | * | + | The first step is to set up the email mailbox. Thunderbird can retrieve emails via IMAP. |
| − | + | [[Datei:Screenshot_Exchange_einrichten_Thunderbird_Windows_10_01.png|links|mini|ohne|350px|Application menu]] | |
| + | <br> | ||
| + | * Open the '''"Application menu"'''. | ||
| + | <br clear=all> | ||
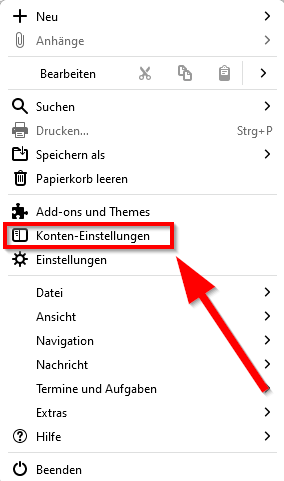
| − | + | [[Datei:Screenshot_Exchange_einrichten_Thunderbird_Windows_10_02.png|links|mini|ohne|350px|Account settings]] | |
| − | + | <br> | |
| + | * Select '''"Account settings"'''. | ||
| − | = | + | <br clear=all> |
| − | |||
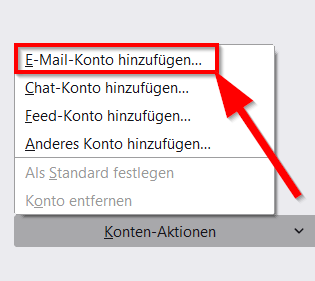
| − | = | + | [[Datei:Screenshot_Exchange_einrichten_Thunderbird_Windows_10_03.png|links|mini|ohne|350px|Add account]] |
| − | + | <br> | |
| + | * Click on '''"Account actions"''' at the bottom left. | ||
| + | * Now select '''"Add email account"'''. | ||
| + | <br clear=all> | ||
| − | == | + | Select the following settings: |
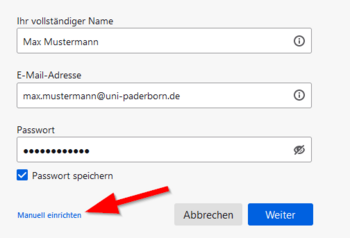
| − | + | [[Datei:Screenshot_Exchange_einrichten_Thunderbird_Windows_10_04.png|links|mini|ohne|350px|Account information]] | |
| + | <br> | ||
| + | * '''Name:''' Enter your name - This will later appear in your emails as the sender name. | ||
| + | * '''Email address:''' Enter your preferred email address - It is best to check this in the service portal. | ||
| + | * '''Password:''' Enter the password for the university account. | ||
| + | <br> | ||
| + | * Check the box for '''"Save password"'''. | ||
| + | * Then click on '''"Set up manually"'''. | ||
| + | <br clear=all> | ||
| + | |||
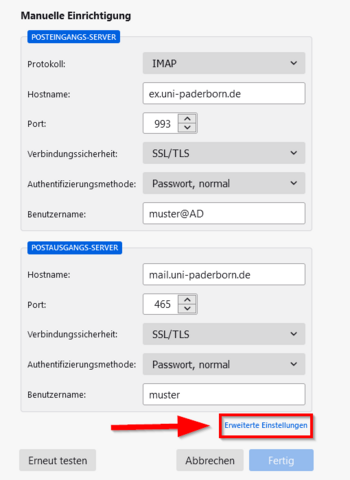
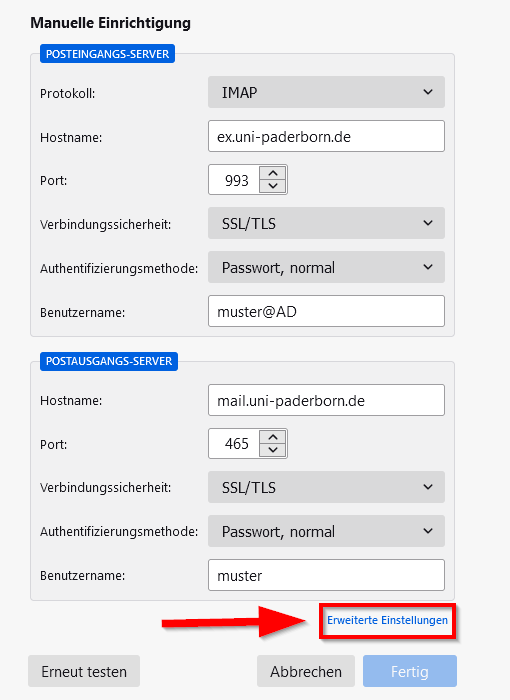
| + | Add the following settings: | ||
| + | [[Datei:Screenshot_Exchange_einrichten_Thunderbird_Windows_10_05.png|links|mini|ohne|350px|Manual settings]] | ||
| + | <br> | ||
| + | Incoming mail server | ||
| + | * '''Protocol:''' IMAP | ||
| + | * '''Hostname:''' ex.uni-paderborn.de | ||
| + | * '''Port:''' 993 | ||
| + | * '''Connection security:''' SSL/TLS | ||
| + | * '''Authentication method:''' Password, normal | ||
| + | * '''User name:''' username@AD - Replace "username" with your username from your university account. | ||
| + | <br> | ||
| + | Outgoing mail server | ||
| + | * '''Hostname:''' mail.uni-paderborn.de | ||
| + | * '''Port:''' 465 | ||
| + | * '''Connection security:''' SSL/TLS | ||
| + | * '''Authentication method:''' Password, normal | ||
| + | * '''User name:''' Your user name from the university account - here without AD | ||
| + | <br> | ||
| + | * Then click on '''"Advanced settings"'''. | ||
| + | <br clear=all> | ||
| + | |||
| + | [[Datei:Screenshot_Exchange_einrichten_Thunderbird_Windows_10_06.png|links|mini|ohne|650px|Confirm the advanced configuration with '''"OK"'''.]] | ||
| + | <br clear=all> | ||
| + | |||
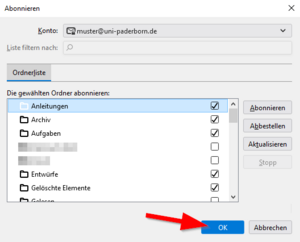
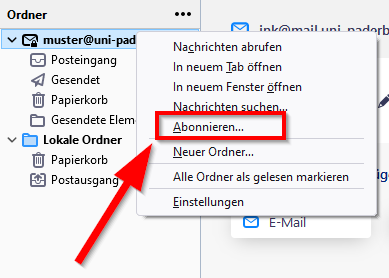
| + | You can now see your email inbox in the Inbox tab. If you are missing folders in the view: | ||
| + | [[Datei:Screenshot_Exchange_einrichten_Thunderbird_Windows_10_07.png|links|mini|ohne|300px|Right-click on the email inbox.]] | ||
| + | <div class="tleft" style="clear:none">[[Datei:Screenshot_Exchange_einrichten_Thunderbird_Windows_10_08.png|links|mini|ohne|300px|Select '''"Subscribe..."'''.]]</div> | ||
| + | <div class="tleft" style="clear:none">[[Datei:Screenshot_Exchange_einrichten_Thunderbird_Windows_10_09.png|links|mini|ohne|300px|Select the desired folders and click '''"OK"'''.]]</div> | ||
| + | <br clear=all> | ||
| + | |||
| + | ==Setting up a calendar== | ||
| + | Calendars and tasks can also be synchronized via Exchange. To use this in Thunderbird, additional programs must first be installed. | ||
| + | |||
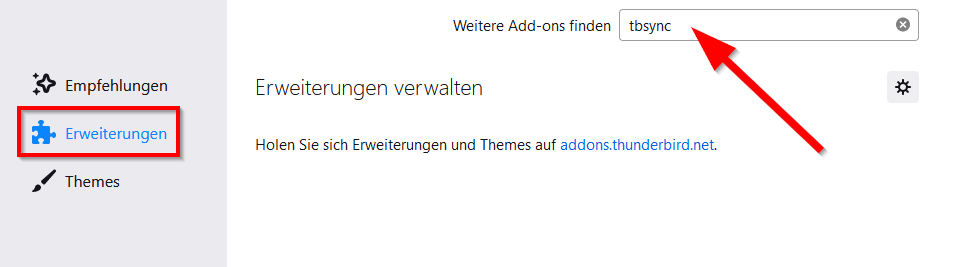
| + | ===Install add-ons=== | ||
| + | [[Datei:Screenshot_Exchange_einrichten_Thunderbird_Windows_10_12.png|links|mini|ohne|450px|Application menu]] | ||
| + | <br> | ||
| + | * Open the application menu. | ||
| + | * Click on '''"Add-ons and themes"'''. | ||
| + | <br clear=all> | ||
| + | |||
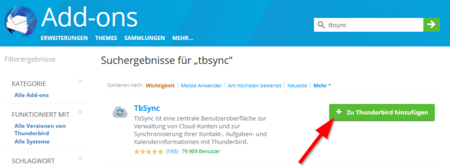
| + | [[Datei:Screenshot_Exchange_einrichten_Thunderbird_Windows_10_13.png|links|mini|ohne|450px|Extensions]] | ||
| + | <br> | ||
| + | * Select '''"Extensions"''' on the left-hand side. | ||
| + | * Search for '''"tbsync"'''. | ||
| + | <br clear=all> | ||
| + | |||
| + | [[Datei:Screenshot_Exchange_einrichten_Thunderbird_Windows_10_14.png|links|mini|ohne|450px|Add TbSync]] | ||
| + | <br> | ||
| + | * For the application '''"TbSync"''', click on '''"Add to Thunderbird"'''. | ||
| + | * For the following permissions query, also click on '''"Add"'''. | ||
| + | <br clear=all> | ||
| + | |||
| + | [[Datei:Screenshot_Exchange_setting_Thunderbird_Windows_10_15.png|links|mini|ohne|450px|Add provider for EAS]] | ||
| + | <br> | ||
| + | * Then search for '''"Provider for Exchange ActiveSync"'''. | ||
| + | * Here too, click on '''"Add to Thunderbird"'''. | ||
| + | * For the following permissions query, also click on '''"Add"'''. | ||
| + | <br clear=all> | ||
| + | |||
| + | ===Set up calendar=== | ||
| + | [[Datei:Screenshot_Exchange_setting_up_Thunderbird_Windows_10_16.png|links|mini|ohne|450px|Open TbSync]] | ||
| + | <br> | ||
| + | * There is now a new icon in the top right corner of the mailbox tab. | ||
| + | * Open '''"TbSync"''' by clicking on this icon. | ||
| + | <br clear=all> | ||
| + | |||
| + | [[Datei:Screenshot_Exchange_setting_up_Thunderbird_Windows_10_17.png|links|mini|ohne|450px|Add account]] | ||
| + | <br> | ||
| + | * Click '''"Account Actions"''' at the bottom left. | ||
| + | * Select '''"Add account"'''. | ||
| + | * Click '''"Exchange ActiveSync"'''. | ||
| + | <br clear=all> | ||
| + | |||
| + | [[Datei:Screenshot_Exchange_setting_up_Thunderbird_Windows_10_18.png|left|mini|without|450px|Account information]] | ||
| + | <br> | ||
| + | * Select '''"User-specific configuration"'''. | ||
| + | * Select the following settings | ||
| + | <br> | ||
| + | * '''Account name:''' username@ex.uni-paderborn.de - Replace "username" with the username for your university account. | ||
| + | * '''Username:''' username@AD - Replace "username" with the username for your university account. | ||
| + | * '''Password:''' Password for your university account | ||
| + | * '''Server address:''' ex.uni-paderborn.de | ||
| + | <br clear=all> | ||
| + | |||
| + | [[Datei:Screenshot_Exchange_setting_up_Thunderbird_Windows_10_19.png|links|mini|ohne|450px|Synchronization status]] | ||
| + | <br> | ||
| + | * Check the box for '''"Activate and synchronize account"'''. | ||
| + | * Under Resources, select the content you want to synchronize. | ||
| + | * Set the interval for periodic synchronization - recommended 5 minutes. | ||
| + | * Finally, click on '''"Synchronize now"'''. | ||
| + | <br clear=all> | ||
| + | |||
| + | ===Link mailbox=== | ||
| + | In order to be able to send and accept appointments, you must assign a mailbox to the calendar. | ||
| + | [File:Screenshot_Exchange_setting_Thunderbird_Windows_10_10.png|left|mini|without|450px|Select calendar.]] | ||
| + | <br> | ||
| + | * Right-click on your calendar. | ||
| + | * Select '''"Properties"'''. | ||
| + | <br clear=all> | ||
| + | |||
| + | [[Datei:Screenshot_Exchange_setting_up_Thunderbird_Windows_10_11.png|links|mini|ohne|450px|Edit calendar.]] | ||
| + | <br> | ||
| + | * Under '''"Email"''', select your mailbox. | ||
| + | * Then click '''"OK"'''. | ||
| + | <br clear=all> | ||
| + | |||
| + | ==Alternatives== | ||
| + | * The paid add-on "Owl" can also be used to connect to the email mailbox. | ||
| + | * However, "TbSync" and "Provider for Exchange ActiveSync" are still required to synchronize calendars and tasks. | ||
| + | |||
| + | ==See also== | ||
| + | * [[Exchange]] | ||
| + | <br clear=all> | ||
Version vom 30. September 2024, 09:47 Uhr
Die deutsche Version finden Sie auf der Seite Exchange einrichten in Thunderbird (Windows)
For Exchange accounts, we recommend using Microsoft Outlook.
|
Install Thunderbird[Bearbeiten | Quelltext bearbeiten]
Install Thunderbird. You can find the installation files here:
Set up an email mailbox[Bearbeiten | Quelltext bearbeiten]
The first step is to set up the email mailbox. Thunderbird can retrieve emails via IMAP.
- Open the "Application menu".
- Select "Account settings".
- Click on "Account actions" at the bottom left.
- Now select "Add email account".
Select the following settings:
- Name: Enter your name - This will later appear in your emails as the sender name.
- Email address: Enter your preferred email address - It is best to check this in the service portal.
- Password: Enter the password for the university account.
- Check the box for "Save password".
- Then click on "Set up manually".
Add the following settings:
Incoming mail server
- Protocol: IMAP
- Hostname: ex.uni-paderborn.de
- Port: 993
- Connection security: SSL/TLS
- Authentication method: Password, normal
- User name: username@AD - Replace "username" with your username from your university account.
Outgoing mail server
- Hostname: mail.uni-paderborn.de
- Port: 465
- Connection security: SSL/TLS
- Authentication method: Password, normal
- User name: Your user name from the university account - here without AD
- Then click on "Advanced settings".

You can now see your email inbox in the Inbox tab. If you are missing folders in the view:


Setting up a calendar[Bearbeiten | Quelltext bearbeiten]
Calendars and tasks can also be synchronized via Exchange. To use this in Thunderbird, additional programs must first be installed.
Install add-ons[Bearbeiten | Quelltext bearbeiten]
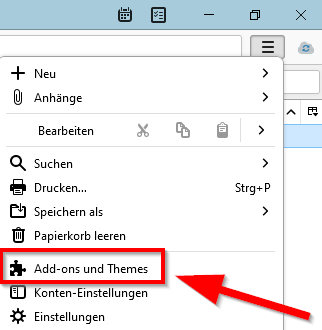
- Open the application menu.
- Click on "Add-ons and themes".

- Select "Extensions" on the left-hand side.
- Search for "tbsync".
- For the application "TbSync", click on "Add to Thunderbird".
- For the following permissions query, also click on "Add".
Datei:Screenshot Exchange setting Thunderbird Windows 10 15.png
Add provider for EAS
- Then search for "Provider for Exchange ActiveSync".
- Here too, click on "Add to Thunderbird".
- For the following permissions query, also click on "Add".
Set up calendar[Bearbeiten | Quelltext bearbeiten]
- There is now a new icon in the top right corner of the mailbox tab.
- Open "TbSync" by clicking on this icon.
- Click "Account Actions" at the bottom left.
- Select "Add account".
- Click "Exchange ActiveSync".
Datei:Screenshot Exchange setting up Thunderbird Windows 10 18.png
Account information
- Select "User-specific configuration".
- Select the following settings
- Account name: username@ex.uni-paderborn.de - Replace "username" with the username for your university account.
- Username: username@AD - Replace "username" with the username for your university account.
- Password: Password for your university account
- Server address: ex.uni-paderborn.de
Datei:Screenshot Exchange setting up Thunderbird Windows 10 19.png
Synchronization status
- Check the box for "Activate and synchronize account".
- Under Resources, select the content you want to synchronize.
- Set the interval for periodic synchronization - recommended 5 minutes.
- Finally, click on "Synchronize now".
Link mailbox[Bearbeiten | Quelltext bearbeiten]
In order to be able to send and accept appointments, you must assign a mailbox to the calendar.
[File:Screenshot_Exchange_setting_Thunderbird_Windows_10_10.png|left|mini|without|450px|Select calendar.]]
- Right-click on your calendar.
- Select "Properties".
- Under "Email", select your mailbox.
- Then click "OK".
Alternatives[Bearbeiten | Quelltext bearbeiten]
- The paid add-on "Owl" can also be used to connect to the email mailbox.
- However, "TbSync" and "Provider for Exchange ActiveSync" are still required to synchronize calendars and tasks.
See also[Bearbeiten | Quelltext bearbeiten]


